Saturday, October 29, 2016

Aspen: Printing Student Gradebook

Image 1
If you would like a printed copy of your Aspen Gradebook worksheet, 


  • Select Gradebook tab
     
  • Select the course
     
  • In the left hand navigation options, select Scores
     
  • Your gradebook will appear on the screen.
     
  • Select Reports -> Gradebook Sheet
    (image 1)


Image 2
  • The Gradebook Sheet (image 2) will appear.  Click Run.


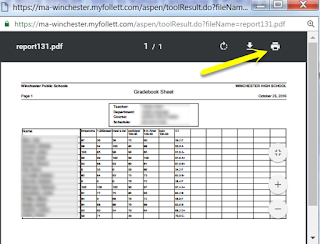
  • The printable version of your gradebook will pop-up (Image 3)
     
  • Select Printer icon at the top of the Gradebook Sheet page.


Wednesday, October 26, 2016

Activating Your ID Badge to Universal Copiers

In order to print to the universal printer/copiers you must 1st activate  your ID badge. To activate, bring your ID badge to one of the universal printers, and follow the steps below:
  1. Press the Services Home button on the printer.
           
https://lh5.googleusercontent.com/t8wLT_ApnnNFboio6OQ961krMCsrYCrSL3LbFB4xd3Sr9dQWLk2rwxOZhT5YhJWOhg08eHt8NadcsdQ74dMgIhSJ5-BXykuuZ_TYCyLXypUdJqc-Lsbgq1dfI2wf37b0veqfl86x
  1. Swipe your badge over “SCAN CARD HERE”
  • Try it face up and then face down
  • You will hear a beep once scanned correctly

https://lh5.googleusercontent.com/iZPwToVyLzd0ywK85OWF7NCTr6EpUpKVFps-zYYt7BljUlTQP4uhe0GJdvDOG6N8M6p-TtE4I8JQ0mfj8PgrzxCFt1hmgE6LVIoxKccXLk-3lahn5gy2_rYXi91xklE7pa4mrAAd
  1. Associate Card screen
  • Press Yes

https://lh5.googleusercontent.com/9yyvNhtH1CA1TsPDxrZFioMzbAB37L2kfCkuXU_UTh7bqhoplilu5uWZ3S-d3p1hSoTOroQpfZB7uJs5SOlxtfud4QoQcLawZ7MDNVs_B4GlDE0tyT9U2XVXQrzq-UecaP9GWeGZ

  1. Associated Card – Username
  • Enter your computer login username (ex) jdoe, press done

https://lh5.googleusercontent.com/tBzFfBbaMvvUQslznLswBDpec2JjDIgz6K82Y9kUCoQBzRnkSDHCl_9KtrHYxPde46UnN-nnf-H_yFQQvIx4Zh3vLKBPhDwjXrHcg6F-nvAVLntjzFQv7DuSgx7Q3ddmv4hPDy9e

  1. Associated Card – Password
  • Enter your computer login password, press done

https://lh4.googleusercontent.com/_wcGkn075AHz9e4GCX4FupuBzby0tUvByfxBxf0-CTsx2Go30rT9gP9K6xPaz_WVKhgoxmbZK-6k07bCac56UtDWk4waRp_hExpyOqF4Mb0uwcOQqFZeEQNp7klDIQOmZ-atGXeU

  1. Card Associated – Successful
  • Press Yes

https://lh4.googleusercontent.com/J-lQLJkXkWj1W1kWeD_0d4z2kZ-ZE8--Qod8qU5hi1JCIm04D-35bZVYI7iGTqtKJljJp2f49ZjiwKua_IgM7mO5tiXqIiz6vau2BBc6YtjntxXpAmLY3Y3_SE5dHJZbnqkiWkoN
  1. Logout

Option 1:  You can swipe your badge over the “SCAN CARD HERE”

                          Option 2:  Press the Logout button

Updating iOS on an iPad

How to Update iOS on an iPad

*Before you update, make sure your iPad is charged more than 90%.
  1. Launch Settings from your Home screen.
  2. Tap on General.

  1. Tap on Software Update.
  2. Tap on Download and Install.
  3. Enter your Passcode, if prompted.
  4. Tap Agree to the Terms and Conditions.
  5. Tap Agree again to confirm.

This may take a while to finish. Do not power off the iPad until it is done.
*If you have a recent update, it will ask if you want to update overnight. This is okay, but keep your iPad plugged in.

*The more often you update, the less time it will take in the future.

Monday, October 24, 2016

Aspen: WHS Teacher Attendance Information


You can view detailed information about a student’s attendance by clicking on the student’s name in the master student list and then clicking on the attendance side tab.  


Check for E(xcused)
Anything marked with an E (A-E, D-E, and T-E) indicates that the absence/dismissal/tardy is excused.  Check the description under "reason" to determine if the reason is one that qualifies under the "exemptions to the N rule" list.  

School Attendance is recorded during second period
Second period class attendance records school attendance.  You can choose anytime during the entire second period class to enter attendance.  That is, you can enter attendance at the beginning of class or wait until the end; the choice is yours to make.  

How to change School Attendance
You can update your class attendance by re-entering it, but this does not update school attendance.  To make a change to school attendance after you have posted attendance, you MUST email Cindy. Again, you now have until the end of second period to record attendance.

*** Inputting it at the end of the block is one way to avoid having to email updates after the fact.  

Parent Notification when Absent or Tardy
As a matter of best practice, parents need to be contacted when kids are coming late/absent to class.  The first a parent hears about class attendance issues shouldn’t be when the N rule is happening.

When a student has been absent unexcused from your class, contacting home to check "to see if X student is okay" is a great way to build a connection/relationship, and when kids know we are checking up on them, they are less likely to skip class.

Where to get help
If you need help with attendance in Aspen, please see Kathy Grace, Paula Conis or Dennis Mahoney.   If you are unsure about a student’s attendance status, see the appropriate guidance counselor, assistant principal, or Cindy Gallagher.  

N-Rule
According to the student handbook (p.14), all absences count towards the N rule except the following:
  • extended illness with medical documentation
  • college visits 
  • bereavement
  • field trips
  • suspensions
  • exemptions granted by the principal
  • religious and ethnic observances

Thank you to Paula Conis for the content of this blog.

Monday, October 17, 2016

Aspen Quick Reports

Aspen has a lot of useful information for teachers about students. For example, teachers can look up student emails, emergency contacts, and No Photo lists. These directions are specific to the No Photo list, but can be used for many other types of useful information:

Creating a Quick Report to show the class No Photo list
  1. Click on your Student tab.
  2. Click Reports
  3. Choose Quick Report.
This will bring up a pop-up for you to start making choices.
5. Choose New Report
6. Keep it on Simple
Then in the left box (Available Fields), you will be prompted to add the resources you would like to add to your report.
If you click the A/Z box, it will alphabetize the choices for you.


7. Scroll down to choose PHOTO RELEASE
8. Click the button.
9. Choose First name, Last name...any other information you would like to add to your report, and click the ADD button again.


If there is anything in the box on the right (Selected Fields) that you do NOT want, choose it and click the REMOVE button.


By using the UP and DOWN buttons, you can place your selections in the order you want them to appear in your report.


10. Once your Selected Fields box shows all the information you would like, click Next.


Now in the Selected Fields box, it will show how your report will be organized (most likely by name) Click Next, and Next again. This will bring you to the Quick Report: Format Options Page. The default is webpage. You could also choose csv file if you prefer.


11.  For a quick check, you could click FINISH, and then view your report.


12. If you would like to save this report in Aspen, click NEXT again until you get to the Quick Report: Save Options page.


13. Name your Report. Click FINISH.

Thursday, October 13, 2016

Aspen: Assigment Extra Credit

Do you have assignments in which you want to give Extra Credit to students?

In Aspen, you can easily give your students Extra Credit on assignments.  This option is available when creating your assignment in the gradebook (see yellow box on image right).
There are two Extra Credit choices listed under Options on the right hand side of the Assignment page.  
Extra Credit Checkbox
The first choice is Extra Credit and checking the box makes the entire assignment an extra credit assignment.  
Note: If you select this checkbox, do not enter a value in the Extra Credit points field. 
  • Select the Extra Credit - whole assignment checkbox to treat the entire assignment as extra credit; or
  
Extra Credit Points
The second choice is Extra Credit Points.  This is the number of extra credit points that a student can earn on an assignment.  
Note: If you enter a value in this field, do not select the Extra credit checkbox.
  • Enter a value in the Extra credit points field to allow students to earn extra points, in addition to their earned points, for this assignment.

Choosing Both Options
If you select both options, then the entire assignment is considered to be extra credit AND the student can extra credit points on top of the total points earned for the assignment.

Choosing both assignments will affect your total for the quarter, making it appear much higher than it should.


Tuesday, October 11, 2016

Grading: Why your total may appear different than the Student/Parent Portal total

Parents and students may see a different total grade for your course then you do based on the visibility of your assignment (public, private, public no grades).  
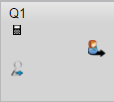
In the gradebook there is a "portal averages" icon right next to the term average column in the gradebook.  Teachers can expand to see any discrepancies between what they get to see, and what students and parents get to see.  Those discrepancies are caused by assignments being flagged as private.

To see the portal average
(i.e., the total that parents and students are seeing) for your course click on the 
 icon in the Quarter total box (see right).


Visibility: Private
In the portal, assignments marked as private do not exist as far as the portal (or the Academics side-tab in the Student top-tab) is concerned.  Those assignments don't exist, so they don't get factored into the average that gets displayed in the portal.   

Visibility: Public No Grades
Similarly, assignments that are "public no grades" are not factored into portal averages, even if scores have been entered. Only the details of that assignment show in the portal so the assignment exists, as far as students and parents can tell, but no scores exist for it.  

Visibility: Public
Only "public" assignments are counted in the quarter average when Aspen calculates the averages displayed in the portal.

Example:
In the example below, the column marked in yellow shows the Q1 total as the teacher sees the grades.  
The column marked in pink shows the Q1 total that is visible to parents/students (i.e., the portal view).

Note how the totals are affected and that Q1 CW is public, and Q1 CW2 is marked private.

Friday, October 7, 2016

Creating a Pass/Fail Grade Scale in Aspen

Teachers can create a Pass/Fail Grade Scale in Aspen.  This grade scale will only affect your assignment grades. To do this, follow the steps below.

Find the Grade Scale page
  • From the Aspen home screen, select Tools (marked 1 in photo below).
     
  • In the Tools navigation bar on the left, select Grade Scales (2).
      
  • From the Options tab, select Add (3).


Create the New Grade Scale
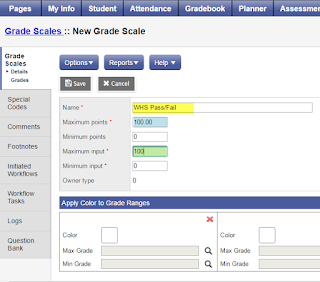
  • Name your Grade Scale (see yellow (right)
     
  • Add the Maximum Points (blue).  This is the maximum number of points that a student can earn for an assignment using this grade scale.
     
  • Add the Maximum Input (green).  This is the highest value that you will input.
     
  • Click Save.


Add the Grades to the Grade Scale


  • Select the new Grade Scale that you created (marked 1 right)
     
  • Then click on the Grade Scales -> Grades link in the left hand side navigation (marked 2)
     
  • Click Options button up top and then Add (see image below)


New Grade Definitions
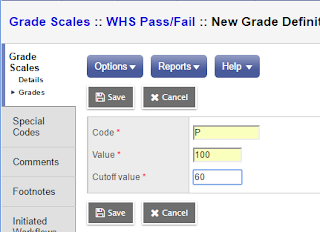
  • Define your grades.
    In the image right,  I have defined "P" as being a grade between 60 and 100.
     
  • Click Save
     
  • Add another code for "F" with the value between 0 and 59.
     
  • You will end up with the Grade Scale Below.
     
  • For all of your classes that should be marked as Pass/Fail, replace the High School Grade Scale with this Grade Scale.  I gave my student a 95 and it previously stated that this was an A, now it says P.


For more help, check out the Aspen help guide - Create Teacher Grade Scales in the Gradebook.