Tuesday, September 19, 2017

Setting up your Aspen Gradebook


Have you set up your gradebook yet?  
At the beginning of the year, you need to create the defaults for your class and also decide how Aspen will calculate grades for the year (e.g., using categories, points, or both).  
Until these steps are completed, you will not be able to add assignments to your gradebook.

The good news is Aspen has created a Reference guide to help you through your gradebook setup.  Check it out at Beginning of the Year Gradebook Checklist.

If you prefer an in person setting, there will also be a Gradebook workshop during the September 28th Professional Development.

Thursday, September 7, 2017

Customize Columns in Aspen using Field Sets

When you click the "Students" tab in Aspen, you get a predefined set of information columns. Sometimes it's not the information you want.


Fortunately, you can customize the columns (fields) to suite your needs. In addition, you can save different sets of information for different situations (e.g., contacts, logins, birthdays, etc.) Here's how:

1. Click the Field Set button and select "Manage Field Sets..."


2. Click the +New button.


3. Type a name for your field set.

4. Select the information you want and click Add>>. Repeat as necessary.

5. Click Save.


6. Your new field set will show up at the bottom of the list. Use the ^Up button to move it further up in the list for convenience.

NOTE: Whichever field set is at the top of your list will become the default field set when you sign into Aspen. To change it temporarily, just click the Field Set button and select the one you want. To set the default, click the field set button, click "Manage Field Sets...", select the field set you want as default, and use the ^Up button to move it to the very top of the list.

Wednesday, September 6, 2017

IT Issues? Put in a Help Desk Request

Just a reminder that when you have technology issues, you should put in a Help Desk Request (a.k.a. School Dude).

To find the Help Desk Request screen, go to this blog WPS-TechEd.blogspot.com and click on the Help Desk Request tab at the top of the page.


This link takes you to the Help Desk Open Support Ticket screen.  

Directions for submitting a ticket can be found at the bottom of the page.  

If you have never submitted a ticket before, see the link (under the yellow highlight) for directions.


Bookmark both the blog and the Help Desk page in your browser by clicking the star on the right side of the address bar.


Sunday, September 3, 2017

Sharing Google Drive Files and Folders with Parents

Have you ever shared a file from your Google Drive only to get the following message?


Here are two methods to share your files or folders with parents so they get them the first time.

Method 1: Share

1. Right-click your file/folder and select "Share".


2. Click Advanced.


3. Click Change.


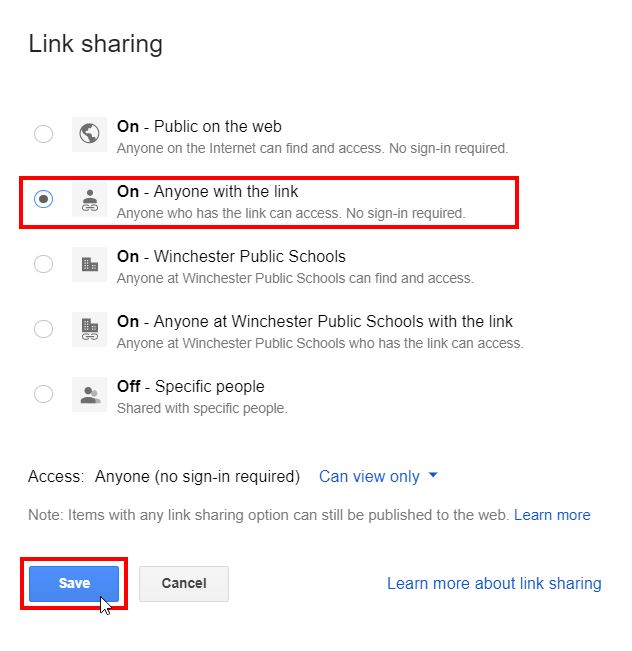
4. Select "On - Anyone with the link" then click Save.


Now, whether you copy and paste the link into an email or website, or use the Drive icon to insert your file/folder into an email or website, parents will be able access your file/folder.

Method 2: Get shareable link


1. Right-click the file/folder you want to share and select "Get shareable link".


2. Turn on link sharing by moving the switch from left to right. 


NOTE: This shares your file or folder with WPS accounts only.


3. To share your file or folder with parents, click Share settings.


4. Click "Anyone at Winchester..."


5. Click More.


6. Select "On - Anyone with the link" then click Save.


Now, whether you copy and paste the link into an email or website, or use the Drive icon to insert your file/folder into an email or website, parents will be able access your file/folder.