Thursday, November 9, 2017

Google Classroom Update

If you are using Google Classroom, you may be interested to know that Google has made some updates to Google classroom including the ability to import grades from a Google Form directly into your Google Classroom.

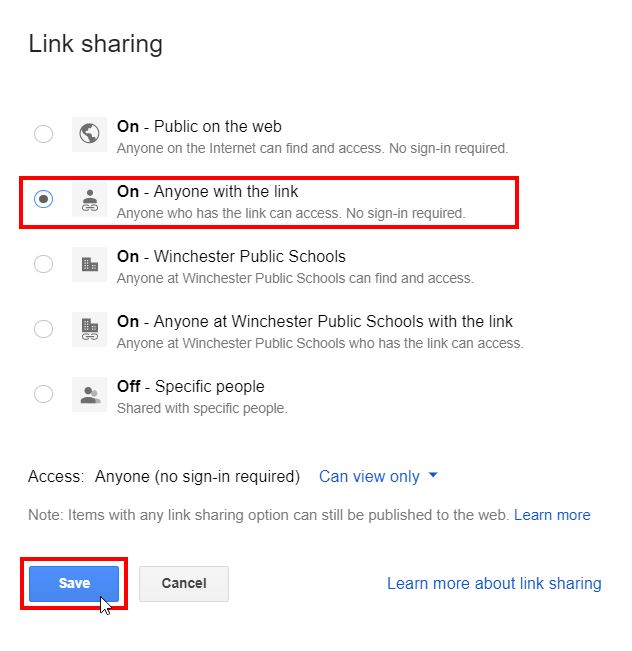
Grade and return a Google Forms quiz
  1. If the assignment has a Google Forms quiz, and grade importing was enabled when you created the assignment, click Import grades.
  2. Click Import to confirm.
    Note: Importing grades will overwrite any grades already entered.
    You’ll see the grades autofill at the students’ names.
  3. Click Return to return the grades to students.
    Students can also view their grades in Forms.
Note: If you didn’t enable grade importing when you created the assignment, you can edit the assignment to enable it after the assignment is posted and completed by students. 
For more information on Grading and Returning Assignments in Google Classroom, check out the Google Help Pages.

Monday, October 30, 2017

Aspen Gradebook - Visibility Types


Aspen offers three visibility types: Private, Public, and Public -- no grades.  As you create an assignment for your students, you will be asked to set an initial status for the assignment.  The choice is up to you.  

What do each of the Visibility Types mean?

Private Assignments do not appear in the Student or Family portals

 
Public Assignments and grades appear in the Student and Family portals
Public -- no grades Assignments appear in the portals, but grades do not.


How can I see the Visibility Type of an assignment?

When viewing the Scores page of your gradebook, you will see privacy icons associated with each of the assignments located on the last line of the assignment.  


How do I change the Visibility Type Status?

Clicking on the icon allows you to toggle between the three visibility types.


Thursday, October 5, 2017

Progress Reports in Aspen

Aspen Progress ReportsSome teachers have some questions as to what it means to create a Progress Report in Aspen.  So I thought I would clarify what it means to Post Grades or Publish a Progress Report.

Posting Grades as a Progress Report
To post grades, you need only change the visibility type on your assignment(s) in your gradebook.  To learn more, check out my blog entry on visibility types.  

Once you make an assignment PUBLIC, then the assignment is visible on both the student and family portals.  There is no need to publish a formal progress report, because you are updating students and parents on the progress in the class.  

Posting Grades
There is an option to Post Grades under the Option tab on your gradebook page.  This will be used when you Post Quarter grades.  It is not used for progress reports.

Progress Reports
There is an option under the Reports tab for Progress Reports.  This option allows you to print a progress report for a single student OR to print out progress reports for ALL students.  It will not send a progress report to each individual student.

Tuesday, September 19, 2017

Setting up your Aspen Gradebook


Have you set up your gradebook yet?  
At the beginning of the year, you need to create the defaults for your class and also decide how Aspen will calculate grades for the year (e.g., using categories, points, or both).  
Until these steps are completed, you will not be able to add assignments to your gradebook.

The good news is Aspen has created a Reference guide to help you through your gradebook setup.  Check it out at Beginning of the Year Gradebook Checklist.

If you prefer an in person setting, there will also be a Gradebook workshop during the September 28th Professional Development.

Thursday, September 7, 2017

Customize Columns in Aspen using Field Sets

When you click the "Students" tab in Aspen, you get a predefined set of information columns. Sometimes it's not the information you want.


Fortunately, you can customize the columns (fields) to suite your needs. In addition, you can save different sets of information for different situations (e.g., contacts, logins, birthdays, etc.) Here's how:

1. Click the Field Set button and select "Manage Field Sets..."


2. Click the +New button.


3. Type a name for your field set.

4. Select the information you want and click Add>>. Repeat as necessary.

5. Click Save.


6. Your new field set will show up at the bottom of the list. Use the ^Up button to move it further up in the list for convenience.

NOTE: Whichever field set is at the top of your list will become the default field set when you sign into Aspen. To change it temporarily, just click the Field Set button and select the one you want. To set the default, click the field set button, click "Manage Field Sets...", select the field set you want as default, and use the ^Up button to move it to the very top of the list.

Wednesday, September 6, 2017

IT Issues? Put in a Help Desk Request

Just a reminder that when you have technology issues, you should put in a Help Desk Request (a.k.a. School Dude).

To find the Help Desk Request screen, go to this blog WPS-TechEd.blogspot.com and click on the Help Desk Request tab at the top of the page.


This link takes you to the Help Desk Open Support Ticket screen.  

Directions for submitting a ticket can be found at the bottom of the page.  

If you have never submitted a ticket before, see the link (under the yellow highlight) for directions.


Bookmark both the blog and the Help Desk page in your browser by clicking the star on the right side of the address bar.


Sunday, September 3, 2017

Sharing Google Drive Files and Folders with Parents

Have you ever shared a file from your Google Drive only to get the following message?


Here are two methods to share your files or folders with parents so they get them the first time.

Method 1: Share

1. Right-click your file/folder and select "Share".


2. Click Advanced.


3. Click Change.


4. Select "On - Anyone with the link" then click Save.


Now, whether you copy and paste the link into an email or website, or use the Drive icon to insert your file/folder into an email or website, parents will be able access your file/folder.

Method 2: Get shareable link


1. Right-click the file/folder you want to share and select "Get shareable link".


2. Turn on link sharing by moving the switch from left to right. 


NOTE: This shares your file or folder with WPS accounts only.


3. To share your file or folder with parents, click Share settings.


4. Click "Anyone at Winchester..."


5. Click More.


6. Select "On - Anyone with the link" then click Save.


Now, whether you copy and paste the link into an email or website, or use the Drive icon to insert your file/folder into an email or website, parents will be able access your file/folder.

Tuesday, August 22, 2017

Helping students and families reset their Aspen passwords


Have your students or their familes forgotten their passwords for Aspen?
Aspen’s Student and Family Portal users can reset their passwords quickly and easily.

A printable version of this post can be found at: Resetting your student of family portal password in Aspen

Resetting your password (Students)


  1. In your browser, go to the Winchester Public School’s Aspen Site (ma-winchester.myfollett.com)
  2. Click on the link to I forgot my password
    (see red arrow in image on right)


  3. The Password Reset pop-up screen will appear.


    1. Student Login ID’s are the numbers associated with your school Google Account.

    2. Student Primary Email accounts are their school Google account address including the wpsstudent.com.


    A password reset email will be sent to your Primary email address.  Login to that account and click on the link in the email to reset your Aspen password.
  1. The Password Reset pop-up will appear.  

    1. Type in your login ID and your Primary email if they do not automatically fill in.
    2. Answer the security question that you set up when you created your account.  An example of a security question is shown right.
  2. Remember the rules in resetting your password.  Passwords must be
    1. a minimum of 6 characters
    2. Include 1 number
    3. Include 1 capital letter
    4. Inlcude 1 lowercase letter
  3. Passwords cannot include
    1. Your first name
    2. Your middle name
    3. Your last name
    4. Your date of birth
    5. Your gmail numbers
    6. Any sequence of numbers (for example, 123456)


  1. Need help creating a strong password?  Check out this article on how to create a secure password that you will remember.


Resetting your password (Family Portal)
  1. In your browser, go to the Winchester Public School’s Aspen Site (ma-winchester.myfollett.com)
  2. Click on the link to I forgot my password
    (see red arrow in image on right)


  3. The Password Reset pop-up screen will appear.
    1. Family Portal Login ID’s are the email addresses that you shared with your student’s school for communication.

    2. Family Portal Primary Email are the same email address that you used in the Login ID.


  1. The Password Reset pop-up will appear.  

    1. Type in your login ID and your Primary email if they do not automatically fill in.
    2. Answer the security question that you set up when you created your account.  An example of a security question is shown right.


  2. A password reset email will be sent to your Primary email address.  Login to that account and click on the link in the email to reset your Aspen password.
  3. Remember the rules in resetting your password.  Passwords must be
    1. a minimum of 6 characters
    2. Include 1 number
    3. Include 1 capital letter
    4. Inlcude 1 lowercase letter
  4. Passwords cannot include
    1. Your first name
    2. Your middle name
    3. Your last name
    4. Your date of birth
    5. Your gmail numbers
    6. Any sequence of numbers (for example, 123456)


  1. Need help creating a strong password?  Check out this article on how to create a secure password that you will remember.

Wednesday, February 1, 2017

Online Course Recommendations in Aspen

This year, course recommendations will be done in Aspen.
Teachers will recommend students for courses and levels and then students and parents will use this information to select courses online for the next school year.
 

Set Your Gradebook Preferences to Show Next Year’s Course Recommendations

    SetPreferences-Recommendation1.png
  1. Log in to Aspen.
  2. In the upper right corner, click the triangle next to your name.  A dropdown box will appear.
  3. Click Set Preferences.
  4. Select the Gradebook tab.
  5. Check the Show course selection recommendation checkbox. (This may already be set for you as the default.)
  6. Click OK.
  7. SetPreferences-Recommendation2.pngOnce you have completed your recommendations, you may want to uncheck this box, as the recommendations drop-down menus take up quite a bit of room in the gradebook window.  You can always see the recommendations again by changing your preferences.


Recommend Next Year’s Courses for Your Students

    CourseRegistration-1.png


  1. Log on to the Staff view.
  2. Click the Gradebook tab.
  3. Select a course, and click the Scores side-tab.
  4. The Recommendation column appears next to each student's name in your gradebook.
  5. You may recommend one or two courses for each of your students.  (Recommending only 1 course is what we advise.)
  6. Recommendation2.png
    Note that you may only recommend courses that are in the same department as the course you are currently teaching the student.  For example, if you are teaching this student Spanish, you may only recommend this student for another course in the World Language department.
  7. To recommend a course for a student, click the down arrow in the Recommendation 1 column.  You will see a list of all courses available (in this case - in World languages).
  8. You can use <CTRL> D if you will be making multiple recommendations for the same course.
  9. The courses that you recommend for students will be marked as "Recommended."  There is nothing to "post".  Please be sure to let students know to look for that when they log in to select their courses.   (However, student registration does not open for a few weeks.)
  10. Recommendation3.pngIf you want, you can leave a comment about why you are recommending this particular course.  Click on the pencil in the comment column, which will open a dialog box, where you can type your comments.
    IMPORTANT: Students and parents will see these comments and this field can be used to communicate with students and families.
  11. You can print a report of the courses you have recommended your students for.  Click on Reports –> Course Recommendation.