Tuesday, December 7, 2021

Creating Aspen Seating Charts

Creating an Aspen seating chart is a great additions to your Sub Folders as it includes the names and photos of your students in their assigned seats.  It is also necessary to share with the nurse's office for contact tracing.  

In this video, I show you how to create your Aspen seating chart and then how to make it a PDF so that you can print it to share in your subfolder and with the nurse's office.

This video is accessible only to Winchester Public School email addresses.

Creating Aspen Seating Charts Video


Wednesday, October 27, 2021

New Google Docs feature - Page Break before Paragraph

Google has added the Page Break before Paragraph feature to Google Docs.  

This feature means that you can better format your paragraphs to start new pages and is especially helpful for titles, subtitles, and headings.

Click on 

Format -> Line and Paragraph Spacing -> Add page break before paragraph


More information can be found at: 

https://workspaceupdates.googleblog.com/2021/10/add-page-break-before-paragraphs-in.html

Thursday, October 14, 2021

How-to use Google Chrome Extensions


What are Chrome Extensions?


Chrome extensions are small programs that you add to your chrome browser which allow you to extend the capability of your browser and customize your browsing experience.

Where do I get Chrome Extensions?

Chrome extensions are available in the Chrome web store

Chrome Web Store - Extensions - Google Chrome

https://chrome.google.com/webstore/category/extensions?hl=en


To add an extension, click on the Add To Chrome button 

Extensions Area - Search bar

When extensions are added, they will appear on the right side of the Search Bar.


How do I manage extensions in chrome?

Manage an Individual extension

Right click on an extension in the search bar


Manage all extensions

The puzzle piece icon - shown on right.
  
Clicking on the puzzle piece
causes the Manage extensions drop down menu to display a list of all extensions that have been enabled and installed in Chrome.

The push pin indicates if the extension is visible on your extension bar.  The pin is blue when visible and gray when not visible.

There are three categories of extensions, 
  1. Full access 
    These extensions can see and change information on the site you are viewing
  2. Access requested
    Click on the extension to give the extension access to the site.
  3. No access needed
    These extensions do not need to see and change the site.
To see even more about the extensions, click on the Manage extensions at the bottom of the window.

More information can be found at the website:

Copied from 
https://kgraceits.blogspot.com/2021/10/how-to-use-google-chrome-extensions.html

Thursday, September 30, 2021

Progress Reports in Aspen


Aspen Progress ReportsWhat is meant by creating a mid-quarter Progress Report in Aspen? 

At Winchester High School, teachers are asked to post at least one visible grades to students and guardians by mid-quarter.  This allows students and guardians to monitor their progress in your class.

With this in mind, I thought I would clarify what it means to Post Grades or Publish a Progress Report.

Posting Grades as a Progress Report
To post grades, you need only change the visibility type on your assignment(s) in your gradebook.  To learn more, check out my blog entry on visibility types.  

Once you make an assignment PUBLIC, then the assignment is visible on both the student and family portals.  There is no need to publish a formal progress report, because you are updating students and parents on the progress in the class.  

Posting Grades
There is an option to Post Grades under the Option tab on your gradebook page.  This will be used when you Post Quarter grades.  It is not used for progress reports.

Progress Reports
There is an option under the Reports tab for Progress Reports.  This option allows you to print a progress report for a single student OR to print out progress reports for ALL students.  It will not send a progress report to each individual student.

Wednesday, September 15, 2021

Translating Slide Presentations using Google Docs


Now that you know how to translate Google Docs and PDFs, you may wonder how do I translate a slide presentation (Google Slides or Powerpoint).  

An add-on to Google Slides called Slide Translator is available.  This add-on will allow you to translate each individual text box in your presentation.  One by one.  Slide by slide.  Oh, did I mention that the text is translated but not installed into the presentation?  You have to do that yourself.  It sounds great in theory, but the execution of the app is not there.

Alternatively, you can download your Google Slide or Microsoft Powerpoint presentation as a PDF. Then upload it to Google Drive.  Then go through the steps in my last blog entry "Translating a PDF using Google Docs" to create a translated copy of the text.  

It's not a perfect solution.  You may lose some formatting and/or pictures.  However, all of the text will be translated in one step.  Much less work than using the Slide Translator add-on.

Copied from Kathleen Grace's Blog

Friday, September 10, 2021

How to translate a PDF using Google Docs

 My last post talked about how easy it is to translate a Google Doc into more than 100 languages.  That is great, but what if you have a PDF that needs to be translated?  How can you quickly and efficiently translate that?

Translating a PDF can be just as easy as translating a Google Doc. 


  1. Upload the PDF to your Google Drive if it is not already in Drive.


  2. Right click on the PDF (1)

  3. Select Open with (2)

  4. Choose Google Docs (3) to open the PDF file in Google Docs.
    Google Docs will then convert your document from a PDF to a Google Doc file.

  5. Once the file opens in Google Docs, you can use the same steps from my previous post, How to Translate a Google Doc.

    (Click the Tools tab, select Translate Document, then choose the language to translate your doc, and click Translate).
Note that some of the formatting may change depending on what your PDF looks like.  You can take the time to edit it and make it pretty if you would like.  


Wednesday, September 8, 2021

How to Translate a Google Doc into more than 100 languages

Translating Google Docs is easy and a great (and simple) way to share classroom information and resources with families.  Additionally, Docs can quickly be translated into more than 100 different languages.

HOW TO TRANSLATE A GOOGLE DOC

  1. Open the Google Doc file that you want to translate in Google Drive.
    Google Doc - Tools tab, Translate Document option


  2. Click the Tools top tab (1)

  3. Select the Translate Document option in the drop down. (2)


  4. The Translate document dropdown will appear.Translate Document function


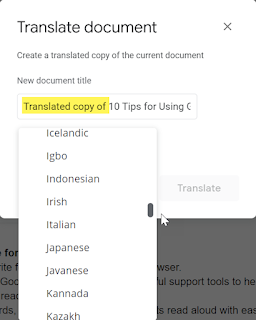
  5.  Notice that the new document title will be preceded by the words "Translated copy of ".  A suggestion is to remove this text and add the words "Translated copy" + the language name at the end of the title.  This will allow all of your translated copies to appear next to the original version in your folder that is sorted alphabetically.

  6. Select the language for which you want to translate your document.  There are more than 100 language choices for this translation.

  7. Click Translate.  Your new translated document will keep all the same formatting of the original Google Doc.


Tuesday, September 7, 2021

Create Seating Charts in Aspen

 Creating Seating Charts with student photos is easy in Aspen.


After you login to Aspen.
  1. Select the Attendance Top Tab.

  2. Select the class for which you want to create a seating chart.

  3. Click Seating Chart link in the left hand column.

    If you are not already in Design Mode, click the Design Mode link on the right side of the page.

  4. Size your grid to match your classroom's rows and desks. 

  5. Click resize to change the configuration in Aspen.

  6. Click the Alphabetical link to auto fill the names of the student.

  7. Your grid will populate with the names of your students.  You can move the names to correctly indicate where students will be sitting in your class.

  8. Exit Design Mode.  You wil now see the pictures and names of your students in your class.

  9. Click the Printer-Friendly Version link on the right of the page to print the page.


Wednesday, May 26, 2021

How to enter Quarter 4 and Final Grades in Aspen

The steps to entering your Quarter 4 grades is similar to entering grades during any other quarter, but you have the additional step of also adding the Final Grade (FG) for the course.


To Post your Q4 grades in Aspen Gradebook,
  1. Go to the Scores page in your Gradebook
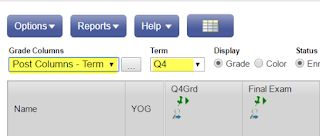
  2. In the Grade Columns drop down box, select Post Columns.  Also, set the Term to Q4.  
    (see yellow in image right)
  3. The Aspen Posting columns will appear.  These are
    • Q4Grd - Quarter 4 Grade
    • Q4ClsAbs - Quarter 4 Class Absences
    • Q4Com1 and Q4Com2 - Quarter 4 Comment 1 and Comment 2 fields
    • Q4 - The grade from your gradebook for quarter 4
    • FG - Final Grade
  1. Click the Update Post Columns button -OR-
    Select Options -> Update Post Columns
  2. This will take you through the Update Post Columns wizard.  (see images below)


  • Step 1. Select the Grade Term (Q4) and the Grades to update (all students).


  • Step 2. Select
  • Quarter 4 Grade = Average:Q4  

  • Q4 Class Absence= Class Absence Total

  • Final Grade = District Calculation


Note that this year this is NO Final Exam grade.
  • Step 3. Confirms the choices made in Step 1 and Step 2.


  1. Click Finish.
  2. You should notice that the Q4Grd and Q4ClsAbs fields will now be populated.

    ** FG Please note: The grade is calculated using all assignments for the year (or semester for semester courses). It is not an average of the final grade for each semester divided by the number of semesters.
  3. Also note that the Final Grade (FG) field has been calculated. Senior Exploration Students
  4. If you have students who are part of the Senior Exploration program, you will leave their Q4G4d field blank. The Final Grade (FG) will still calculate but only include their Q1-Q3 (FY classes) or Q3 (S2 classes) grade.
  5. Pass/Fail/Incomplete/ Medical Grades.  If your class is Pass/Fail or student is to receive an Incomplete or Medical, complete the steps in Update Post Columns.  This will give you the total absences for the student for the quarter.  

    Then add the P, F, I, or M into the Q4Grd column.  All of the grades will have a red circle with a line through it.  This just means that you manually entered the grade.

  6. Pass/Fail/Incomplete/Medical  Final Grade.  Don't forget to also update the FG field for Pass/Fail Grades.  You must manually add the P,F, I, or M to the FG column.


  7.   Add comment codes (see WHS Comment Codes)
    Verifying your Grades
  8. Verify your grade in Q4Grd against the grade from your Gradebook which is labeled Q4


    Q2PostColumns8.png
  9. If you would like to change the grade, simply click on the grade in the Q4Grd field and change it. Grades that you have modified will be indicated by a red, crossed-out circle. 
 PostGrades7.png


Applying the N-Rule (5 or more absences)
  1. In Aspen, you will apply the N-Rule using the comment fields
    • 100 N-Rule: May lose credit for course due to to attendance issues. Contact school administration.
    • 101 N-Rule: Loss of credit, due to attendance issues, under consideration. Contact school administration

black-pushpin.png

What does the pushpin mean?  
  • If the pushpin is black ,
    you can enter grades for this column, but you cannot post them to transcripts yet.
  • If the pushpin is green with a triangle ,
    you can enter and post grades for this column.
  • If the pushpin is red with a square ,
    you already posted the information to transcripts. If you need to change a grade, you will be able to repost your grade for 5 days after the report cards are distributed.  After that, you will need to complete the grade change form (see Guidance department).


POSTING Grades
Once you have verified the grades, added comments, and applied the N-Rule if necessary, you can Post your grades. Posting your grades sends a copy of the grades in the field Q2Grd, S1Exam, and MidGrade (and comments) to the report card / student transcript.

  1. Once the posting period has opened, the pushpin will turn from black to green.  The green signifies that you can post your grades.
  2. To Post your grades, click the Post Grades button -OR- click Option -> Post Grades
  3. The Post Grades pop-up will appear.
    Fill in
    • Grade Term = Q4
    • Grades to post = Term Grades for all Students.
  4. Click Ok
  5. Once your grades are posted, your push pin will change from green to red.
  6. You must Post Grades for each class individually.

HELP! I’m getting an error when I post my grades
PostError.png

This next error may occur with Underclassmen
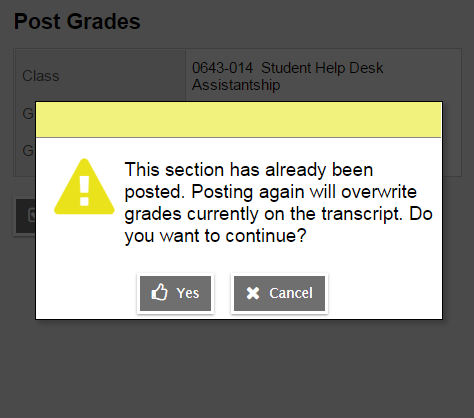
If you get the error “This section has already been posted.  Posting again will overwrite grades currently on the transcript.  Do you want to continue?”
PostError2.png

Click YES.  The reason that you are getting this error is because you had seniors in the class and you already gave them grades and posted them.


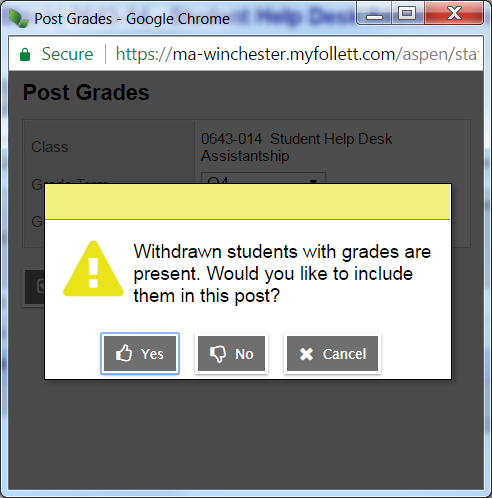
As you continue, you should also receive the error “Withdrawn students with grades are present.  Would you like to include them in this post?”  
My answer is NO.  I have posted my grades for seniors already and do not want to make any changes.   


FAQs

  • You may re-post your grades as many times as you please until the posting period ends.
  • Make a copy of your grades to save for Just in Case OR if you want a printable copy of this page?  
    • Select Reports -> Gradebook Sheet
    • The Gradebook Sheet will appear.  
    • Click Run.
    • The printable version of your Post Columns page of your gradebook will pop-up
    • Select Printer icon at the top of the Gradebook Sheet page.
  • If you planning on using the same comment field for most of the students in your class, you can quickly add the comment to all students by using Options -> Fill Down Values.  Then just change those students who need different comments.

Tuesday, May 4, 2021

Schedule your email send time


Schedule the Send Time in Gmail

Email is a great method for instant communication.  However, there are times when we need to practice a work-life balance.  Setting expectations on when others can expect responses to our work emails is one step in helping to bring equilibrium.

So, answer that email, but schedule it for later delivery.

How to schedule your email delivery time

  1. Write or respond to the email


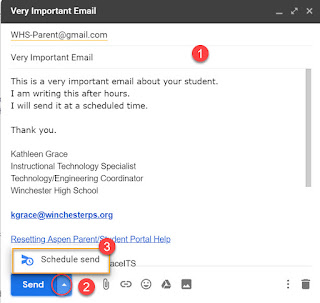
  2. Before hitting Send, click the arrow next to Send in the link.


  3. Click on Schedule Send


  4. This will bring up the box below: Schedule Send
    1. Choose one of the suggested times for sending your email.  When you choose the time, your email is scheduled to send at that time.
    2. Choose to pick the time that you would like to have the email sent by clicking on the link Pick date & time at the bottom of the box.  A pop-up box will allow you to pick a date and time from a calendar.  Once selected, simply click send.  


Once your email is scheduled to send, you will will get a message like the one below in your email.  To cancel sending the email, just click Cancel send.

Thursday, April 29, 2021

Monday, April 12, 2021

Semester Averages in Aspen

Semester Averages in Aspen

In Aspen, the Semester 2 grade is calculated by adding all assignment grades for Q3 and Q4 and then dividing by the number of assignments.  This can cause a problem for grades for Seniors who have a shorter Q4 because the grade will be weighted more towards Q3 because there are so few assignments for Q4.  

Instead, you may prefer that the Q3 grade and Q4 grade to be averaged, rather than the individual grades.

Semester Cumulative Average
On the gradebook screen, click on the settings sprocket located on the right side of the gradebook next to the Post Grades button.   This will open the Set Preferences window.  Select the Averages tab.  Note if the box next to Semester Cumulative Average is selected.  If this is selected, uncheck it.
 
Aspen Help Definition
Semester cumulative average - Select this checkbox to display the semester running average for students in the Staff view. Semester running averages calculate based on the assignment grades within each of the terms inside of it, not on the average for each term.


Wednesday, April 7, 2021

Q3 Grades in Aspen

 How to Enter Quarter 3 Grades in Aspen


Posting Q3 grades is similar to posting Q1 and Q2 grades.
For semester courses, please remember that you must set up your gradebook for the new semester just as you did at the beginning of the year (see the blog entry Setting up your gradebook). This allows you to add assignments to your gradebook.


To Post your grades in Aspen Gradebook,

  1. Go to the Scores page in your Gradebook
  2. In the Grade Columns drop down box, select Post Columns (marked in yellow below)

    Post Columns Term screen


  3. The Aspen Posting columns will appear.  These are
    • Q3Grd - Quarter 1 Grade
    • Q3ClsAbs - Quarter 1 Class Absences
    • Q3Com1 and Q3Com2 - Quarter 1 Comment 1 and Comment 2 fields
  4. Select Update Post Columns button
  5. This will take you through the Update Post Columns wizard.  (see images below)
    • Step 1. Select the Grade Term (Q3) and the Grades to update (Term grades for all students). Then click Next. Step 1

    • Step 2. Accept the next page selections, Quarter 3 Grade = Average:Q3 and Q3 Class Absence= Class Absence Total. Then click Next.
      Step 2
    • Step 3. Confirms the choices made in Step 1 and Step 2.
      Click Finish,
      Step 3
   
  1. These steps populate Q3Grd and Q3ClsAbs fields. Notice that the Q3 grade has been transferred to the Q3Grd field.

  2. Add comment codes (see WHS Comment Codes, McCall Comment Codes)

Changing Grades
  • If you would like to change the grade being reported on the report card/transcript, simply click on the grade in the Q3Grd field and change it. Modified grades will be indicated by a red, crossed out circle.
Pass/Fail/Medical/Incomplete Grades

  • If your class gives Pass/Fail grades, change the grade in this Q3Grd field to indicate a Pass (P), Fail (F), Medical (M) or Incomplete (I).


Applying the N-Rule (5 or more absences)
  1. In Aspen, you will apply the N-Rule using the comment fields
    • 100 N-Rule: May lose credit for course due to to attendance issues. Contact school administration.
    • 101 N-Rule: Loss of credit, due to attendance issues, under consideration. Contact school administration


What does the pushpin mean?  
  • If the pushpin is black ,
    you can enter grades for this column, but you cannot post them to transcripts yet.
  • If the pushpin is green with a triangle ,
    you can enter and post grades for this column.
  • If the pushpin is red with a square ,
    you already posted the information to transcripts. If you need to change a grade, you will be able to repost your grade until report cards are distributed.  After that, you will need to complete the grade change form (see Guidance department).


POSTING Grades
Once you have verified the grades, added comments, and applied the N-Rule if necessary, you can Post your grades. Posting your grades sends a copy of the grades in the field Q1Grd (and comments) to the report card / student transcript.

Once the posting period has opened, the pushpin will turn from red to green. The green signifies that you can post your grades.
  • To Post your grades, click the Post Grades button


The Post Grades pop-up will appear.

  • Fill in
    • Grade Term = Q3
    • Grades to post = Term Grades for all Students.
    • Click Ok


Once your grades are posted, your push pin will change from green to
red. (See image below)


FAQs

  • IMPORTANT: You must Post Grades for each class individually.
  • You may re-post your grades as many times as you please until the posting period ends.
  • There will be no printed verification sheets.  Instead, you can verify your grades on the Post Columns page of your gradebook (see steps 9 and 10).
  • Want a printable copy of the grades that you posted?
    • Select Reports -> Gradebook Sheet
    • The Gradebook Sheet will appear.  
    • Click Run.
    • The printable version of your Post Columns page of your gradebook will pop-up
    • Select Printer icon at the top of the Gradebook Sheet page.
  • If you planning on using the same comment field for most of the students in your class, you can quickly add the comment to all students by using <CTRL> + D or by selecting Options -> Fill Down Values.  Then just change those students who need different comments.


    ADD your email address under the Follow Blog by Email heading in the right hand side of the blog to have automated delivery of each new blog entry