Login to Aspen
Select the Printer icon in near the top right of the page.
 |
| Select Gradebook Tab and then select the class for which you want the roster. |
To print a copy of your class roster, login into Aspen.
Go to Gradebook
Select Gradebook from the top tabs.
Select the course for which you want the roster by clicking the checkbox (see right).
Choose the Roster
 |
| Click Roster in the left hand navigation. Then click the Printer Icon |
In the left hand navigation bar, select Roster. The next screen will give you a complete list of the students in your class.
Print
- Quick Report This option allows you to select the fields that you would like printed on the report. For example, you may want the student name and email address. This option walks you through the steps to create the new report.
- Web Page (HTML)
When you select this option, a pop-up window will appear with the information that is on your screen. You can then select Print from your browser window to print the page.
- Text
Creates a comma delimited text file of the information on your screen. Select this option if you will be importing the data into another software program.
- CSV ***
This is a comma separated values (CSV) file. Use this option if you would like to create an Microsoft Excel or Google Sheets spreadsheet of the data. More about this below.
- Microsoft Word (DOC)
Exports the data to a Microsoft Word document.
Choosing CSV
All of these options have merits and the choice of how you print the roster is up to you. However, if you would like to create a printable table, I recommend the CSV option.

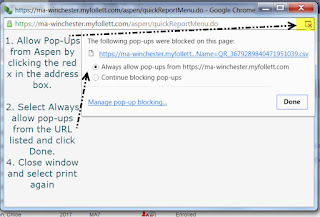
The first time that you select the CSV option, you will need to disable Pop-Ups from Aspen. This is done by clicking the red X in the address bar (see the yellow in picture right).
Then select Allow pop-ups from Follett and click Done.
The window will call and you will have to select the printer icon and CSV again. This second time, Aspen will download a CSV file. When you click on the downloaded file, Microsoft Excel will open and show you the new file.
You may delete columns, add columns, and adjust the information that you have downloaded. You may also print from Excel. Just remember, when you save the modified file, use SAVE AS so that you can change the file type from CSV to Excel.
No comments:
Post a Comment
Do you have any further questions or a suggestion for a later blog?