Friday, November 20, 2020

Zoom App: Keep it updated

The latest Zoom update has a few new features in the Security Shield. This new feature is available through the Zoom app on your school laptop.  

To get new features: 

Open the Zoom app, make sure you're signed in, click your profile picture and click "Check for Updates."  If you need help with this step, see the blog entry (Installing and Updating the Zoom Desktop Client).

Updates for the latest version (11/20/2020).
image.png
  • Hide Profile Pictures (could be checked if you notice an inappropriate profile picture until you have a chance to talk with the student)


  • Start Video (now you can uncheck Start Video to prevent students from turning on their video)


  • Suspend Participant Activities (seems to be mostly for a situation where someone "bombs" a meeting. You can click one button to suspend everything; it also gives the option to report the activity to Zoom in the case of a clearly unauthorized visitor)
image.png

Thank you Phil for the content of this blog entry.

Installing and Updating the Zoom Desktop Client

The Zoom desktop client has more features and security than using the Zoom web portal (zoom.us).  New Zoom features are only available when you have the latest update to the Zoom desktop client.  Zoom also recommends that you use the Zoom desktop client rather than the web client.

This blog entry will walk you through both installing the Zoom desktop client and updating the Zoom desktop client to the most recent version.

Checking if you have the Zoom desktop client already installed on your computer

To check if you already have the Zoom desktop client, type Zoom in the Windows search bar as in 1 in the image below.  If the Zoom app is resident on your computer, you will see the Zoom icon and an open link as in 2 below.


No Zoom desktop client?
To install the Zoom desktop client, click the link: Zoom Desktop Client Download 

This will download the app from the web and you will receive the message below in the bottom left of your screen.

Click Keep and then click on the ZoomInstaller.exe that was downloaded on your computer (see below


) and the Zoom desktop client will be installed on your computer.


Updating your Zoom desktop client version

Start the Zoom desktop client by typing Zoom in the Windows search bar (1) and then clicking on the Zoom app (2).


When you start the Zoom app, you will see the screen below.  Click your image or initial in the top right corner of the box (marked 1).  Then select Check for Updates (marked 2).


Tuesday, November 17, 2020

Teachpoint: Self-Assessment How-to

Self-Assessments are due this week in Teachpoint.  


If you are having difficulty finding the Self-Assessment form in Teachpoint, this video should help.


Monday, November 9, 2020

How to Enter Quarter Grades in Aspen (MS/HS)

How to Enter Quarter Grades in Aspen

Your Aspen gradebook is similar to the paper gradebook that we all used to use.  It’s a private document that only you can see.  At the end of each quarter, your student grades and comments must be posted to make them visible to the school and district.


To Post your grades in Aspen Gradebook,

  1. Go to the Scores page in your Gradebook
  2. In the Grade Columns drop down box, select Post Columns (see marked in yellow with number 1 below)


  3. The Aspen Posting columns will appear.  These are
    • Q1Grd - Quarter 1 Grade
    • Q1ClsAbs - Quarter 1 Class Absences
    • Q1Com1 and Q1Com2 - Quarter 1 Comment 1 and Comment 2 fields
  4. Select Update Post Columns button (marked by number 2 above)
  5. This will take you through the Update Post Columns wizard.  (see images below)
    • PostGrades3.png
      Step 1
    • Step 1. Select the Grade Term (Q1) and the Grades to update (Term grades for all students). Then click Next.
    • Step 2. Accept the next page selections, Quarter 1 Grade = Average:Q1 and Q1 Class Absence= Class Absence Total. Then click Next.
    • Step 3. Confirms the choices made in Step 1 and Step 2. Click Finish,
PostGrades4.png
Step 2
PostGrades5.png
Step 3
   
  1. These steps populate Q1Grd and Q1ClsAbs fields (marked in yellow below).
  2. Add comment codes (see WHS Comment Codes, McCall Comment Codes)

Verifying your Grades
PostGrades6.png
  1. Verify your grade in Q1Grd against the grade from your Gradebook which is labeled Q1. The Q1Grd is the grade that will go to the report card and student transcript.
  2. If you would like to change the grade being reported on the report card/transcript, simply click on the grade in the Q1Grd field and change it. Modified grades will be indicated by a red, crossed out circle. Pass/Fail Grades
  3. If your class gives Pass/Fail grades, change the grade in this Q1Grd field to indicate a Pass (P) or Fail (F).


Applying the N-Rule (5 or more absences)
  1. In Aspen, you will apply the N-Rule using the comment fields
    • 100 N-Rule: May lose credit for course due to to attendance issues. Contact school administration.
    • 101 N-Rule: Loss of credit, due to attendance issues, under consideration. Contact school administration


What does the pushpin mean?  
    • If the pushpin is black ,
      you can enter grades for this column, but you cannot post them to transcripts yet.
    • If the pushpin is green with a triangle ,
      you can enter and post grades for this column.
    • If the pushpin is red with a square ,
      you already posted the information to transcripts. If you need to change a grade, you will be able to repost your grade until report cards are distributed.  After that, you will need to complete the grade change form (see Guidance department).


POSTING Grades
Once you have verified the grades, added comments, and applied the N-Rule if necessary, you can Post your grades. Posting your grades sends a copy of the grades in the field Q1Grd (and comments) to the report card / student transcript.
  1. Once the posting period has opened, the pushpin will turn from black to green.  The green signifies that you can post your grades.
  2. To Post your grades, click the Post Grades button

  3. PostGrades9.png The Post Grades pop-up will appear.
  4. Fill in
    • Grade Term = Q1
    • Grades to post = Term Grades for all Students.
  5. Click Ok
  6. Once your grades are posted, your push pin will change from green to red. (See image below)


FAQs

  • IMPORTANT: You must Post Grades for each class individually.
  • You may re-post your grades as many times as you please until the posting period ends.
  • There will be no printed verification sheets.  Instead, you can verify your grades on the Post Columns page of your gradebook (see steps 9 and 10).
  • Want a printable copy of the grades that you posted?
    • Select Reports -> Gradebook Sheet
    • The Gradebook Sheet will appear.  
    • Click Run.
    • The printable version of your Post Columns page of your gradebook will pop-up
    • Select Printer icon at the top of the Gradebook Sheet page.
  • If you planning on using the same comment field for most of the students in your class, you can quickly add the comment to all students by using <CTRL> + D or by selecting Options -> Fill Down Values.  Then just change those students who need different comments.


ADD your email address under the Follow Blog by Email heading in the right hand side of the blog to have automated delivery of each new blog entry


Wednesday, October 28, 2020

Aspen icon indicating Roster Changes

What does that icon mean?

When you login to Aspen, you are on your Aspen Home screen.  Under the Teacher Classes subheading, a teacher will see all of their classes on that day's schedule. Here there are quick links to take attendance, go to your gradebook, and send parent emails.  You will also see checkmarks when you have already posted attendance and at the end of the quarter after you have posted grades for the section.  

Sometimes, you will see an icon of a folder with a blue dot.  If you hover over this icon, you will see the message,  Click to view roster changes. 


This icon will continue to appear until you check your roster.  To check your roster, you can click on the class name link next to the icon OR you may go to the Gradebook top tab and then click the Roster side tab.

Monday, October 26, 2020

Chrome: Using Profiles to Access Multiple Google Accounts

This is an update to a blog entry that I wrote in 2015.

Have you tried to use more than one Google account (e.g., work and personal) in Chrome and had strange things happen?  Maybe your bookmark bar does not show the web pages you have saved or you have to login repeatedly?

There is a solution to this problem and it is called Google Chrome Profiles.  I have been profiles for more than 6 years, and have found them to be a must-have on every computer I use.   It allows me to keep my work and home account separate.  

Setting up Profiles in Chrome


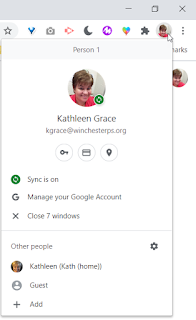
  1. When logged into Chrome, you will see the letter of your first name OR your photo in the top right of  your chrome screen. 


  1. A Google Add person pop-upscreen will appear (as below).  


1. Add the name for the account - this is what you want to call the account 
e.g., Kath (home), TestStudent, etc.

2. Pick an image for your account.

3. Create a Desktop shortcut for the user

4. Click Add, to add the user profile


  1. If you have used Chrome profiles before, your other profiles will appear as mine does below.
    My second profile is Kathleen (Kath (home))


Using your Chrome Profiles
Now when you want to log on to your newly added google account, you click your picture in the top right of your google screen, then select the username listed under Other people.  This will create a new Google Chrome Icon in the tool bar at the bottom of the screen that is associated with the other Google Account.  Now, you will have two separate Google Chrome sessions in separate windows.  

To change a name or photo on your profile, click on the icon associated with the profile in the sign in screen (see green circle below).


Thursday, October 22, 2020

Organize your Google Apps

 Do you find it cumbersome locating your frequently used Google Apps?  

Would you love to reorganize the apps so that your favorite apps are at the beginning of the list? 

I just learned that you can customize your apps list so that you may order them in the way that works best for you!  

  1. Select the Google Apps icon in the top right of your Google Screen.  I often call this the Rubik's cube, others may refer to it as the gray waffle.
  2.  This will expand your Google Apps.


  3. <Right-Click> and hold the app icon that you would like to move.  Your cursor will change to a hand.  (See the red circle marked 1 to the right)


  4. Move the icon to the new location.  Notice that Drive is now in a different location than in image 1 on this screen.


  5.  As another example, Google Classroom can move from mid page to to top of your Apps list.  (See #2 right, and image below)


Monday, October 19, 2020

Zoom - Alternative Hosts

An Alternative Host is different than a Co-host in Zoom. 

Only an alternative host can start a meeting without the host. Think of the Alternative Host as a substitute teacher. Alternative Hosts can start the meeting, set up breakout rooms, share screen permissions...until the host arrives.  Once the host arrives, then only they can assign breakouts...

A co-host can not start a meeting without the host, nor create breakout rooms.

How do you add an Alternative Host to your meeting?

This can be done to meetings that have been previously scheduled.   It is a good idea to set an Alternative Host in case you out of school for any reason.

In Zoom:

1. From your Meetings tab, find the meeting you wish to edit, hover to the right, and click Edit.


2. Scroll all the way to the bottom, and enter the email address of the person you wish to assign as the alternative host to your meetings.

Please note: an Alternative Host MUST have an upgraded account. That means that they must be a teacher, ISS, ESP, or principal/assistant principal.


If you get a message saying “not a user…” that means the staff member needs to find the email from Zoom to upgrade. If they can not find the email, then they should email Lynne Peledge to send it out again.


3. Be sure to click Save. The new alternative host will now get the link to start your Zoom meeting in their email. Be sure to use that link to start the meetings.


Thanks, Lynne!

Friday, October 9, 2020

Zoom buttons unclickable?

The most recent Zoom update has caused some teachers Zoom windows to become unclickable. Symptoms include: you can still see and hear your class, and they can hear you, but you cannot click any buttons, move, resize or close any Zoom windows.


If that is happening to you, try this:
  • Tell your class you will right back
  • Press Ctrl+Alt+Delete and click Task Manager
  • End all instances of Zoom (one at a time)
  • Start your class as you usually would
Since you haven't ended the meeting by doing those steps, "starting" your class will simply re-join you to the meeting in progress.

Tuesday, October 6, 2020

Zoom Security Shield

In my last Zoom post, I mentioned the Lock Meeting feature in Zoom for closing your virtual classroom door.  It was brought to my attention that you can also lock the meeting through the security sheild in Zoom.  This prompted the question, what is the security shield.

Security Sheild in Zoom

The security shield is located in the Zoom tool bar.  


Use the security sheild to quickly change settings in your Zoom session, including locking your meeting and enabling the waiting room.  It can also be used to change participant settings for sharing participant screen, allowing participants to use chat, rename themselves, and to mute the entire class.

Think of this button as your go-to when things go wrong in your classroom.

BTW - Thanks, Phil for enlightening me to this feature!

Tuesday, September 29, 2020

Tips for improving your home internet connection

 Here are some tips for improving and diagnosing your home internet connection.  

  1. Restart your device.
    This can resolve problems with Zoom video and audio problems, software programs that are not working correctly, internet and bluetooth connection issues, and speed up your computer.
    By restarting your computer, you clear out temporary and unimportant data that may be bogging down memory.

  2. What else is using your Wifi?
    Are there other devices on your wifi using your internet bandwidth?  Is someone streaming video (YouTube, Netflix, etc.)?  Do you have a bunch of smart devices around the house?
    You have a limited amount of bandwidth and these other devices may be using up your limited capacity.  Therefore, limit streaming while you are working.

  3. Move closer to your Wifi Router.
    You will get the best internet speed the closer you are to your Wifi Router.  Additionally, if your router is in your closet or in a cabinet, it's time to move it out.  The more central and prominent the better.  Walls can limit the Wifi signal.

  4. Use an Ethernet Cable.
    A wired connection is faster and more stable than a wireless connection.  If your work station is located close to your router, consider plugging it in.  Your internet performance is sure to improve.

  5. What's the frequency, Kenneth?
    Most routers use dual band technology.  This means that the broadcast at both 2.4 GHz and 5 GHz.  If your router allows you to, you may be able to prioritze one or the other for your devices.  2.4 GHz has longer range, but is a slower connection.  Conversely, 5 GHz is a faster connection but has a shorter range.
    So, if you are close to your router, choose the 5 GHz.  If you are on the other side of the house, choose the 2.4 GHz.
    Did you get the reference to the REM 1994 song?

  6. Reboot your Router/Modem.
    Most router/modem from your cable company is one unit.  It is usually a black box with lots of lights on it and the coaxial cable plugs into it.  Unplug the unit's power cable and wait 15 seconds.  Then plug the unit back in and try your Internet again in about a minute.
  7. Do you have a password on your Wifi?
    This is so important for keeping hackers away and so that your neighbors aren't sharing your signal and slowing you down.  AES encryption is the most secure and speed friendly security option.

  8. Run a speed test at https://www.speedtest.net/ 
    Download speeds of less than 5Mbps are going to present some challenges (upload speeds are less of an issue).  Try running the speed tests in various locations in your home to find the optimal location.

  9. If none of these solve your Internet issue, you should call Internet Service Provider.
    Internet Service Provider Troubleshooting pages: Spectrum Comcast SELCO RCN Verizon
This is a modified version of advice from the Worcester Public Schools IT department (Thank you!).  Additional information from Wired Magazine.