If you are looking for new and innovative ways to teach in your classroom, check out these innovative and transformative ideas that Google has assembled.
Some ideas include using the built-in cameras and a green screen to travel the world, bringing STEM into your classroom, and teaching in 3D.
Check it out at:
Innovate & Transform with Chromebooks
Tuesday, December 11, 2018
Thursday, November 1, 2018
How to Post your Q1 Grades
How to Enter Quarter Grades in Aspen
Your Aspen gradebook is similar to the paper gradebook that we all used to use.
It’s a private document that only you can see. At the end of each quarter,
your student grades and comments must be posted to make them visible to
the school and district.
At the beginning of the school year, you should have set up your gradebook
details. The Details page allows you to create your average mode, set up
categories, and link classes. To learn more about setting up your gradebook
details, see my blog entry Setting up your gradebook in Aspen.
To Post your grades in Aspen Gradebook,
- The Aspen Posting columns will appear. These are
- Q1Grd - Quarter 1 Grade
- Q1ClsAbs - Quarter 1 Class Absences
- Q1Com1 and Q1Com2 - Quarter Comment 1 and Comment 2 field
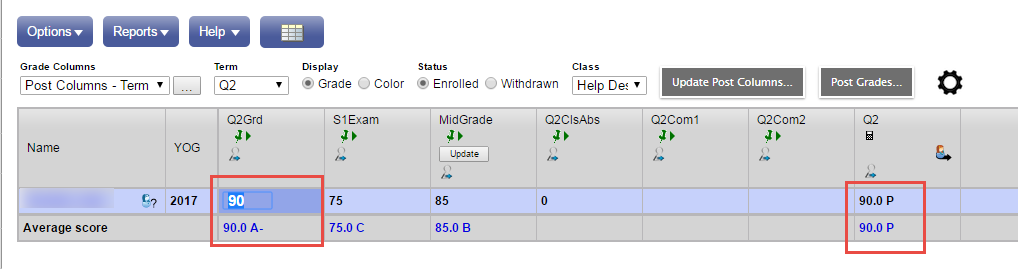
- In the Grade Columns drop down box, select Post Columns - Term (see red circle)
- Select Options -> Update Post Columns
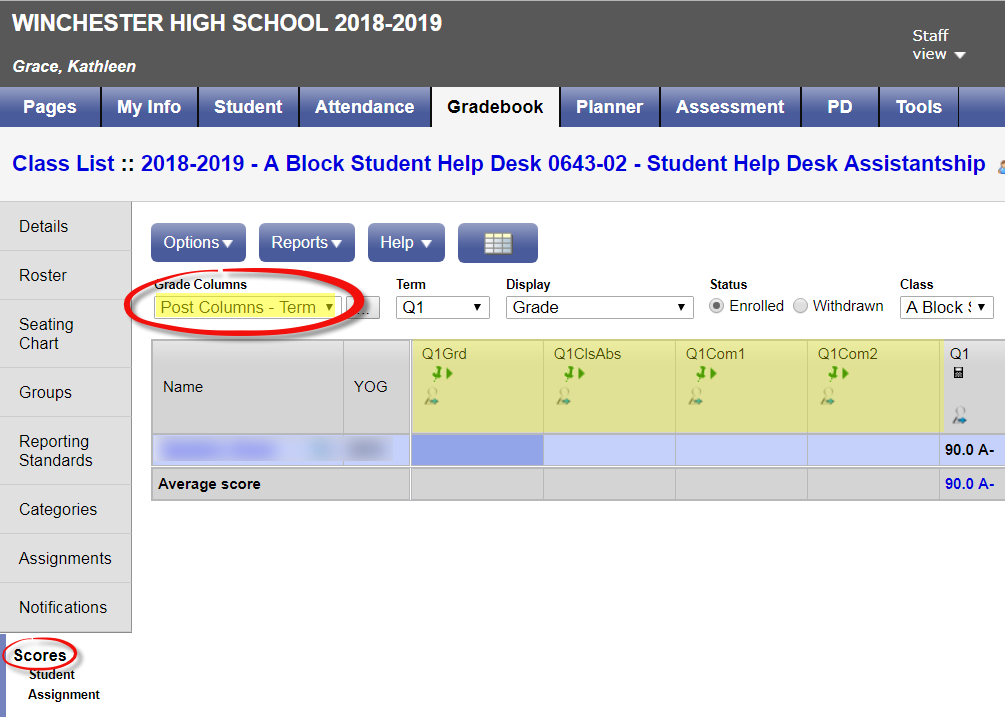

- This will take you through the Update Post Columns wizard.
Step 1. Select the Grade Term (Q1) and the Grades to update (all students).
- Step 2. Select
- Quarter 1 Grade = Average:Q1
- Q1 Class Absence= Class Absence Total

- Step 3. Confirms the choices made in Step 1 and Step 2.

- Click Finish.
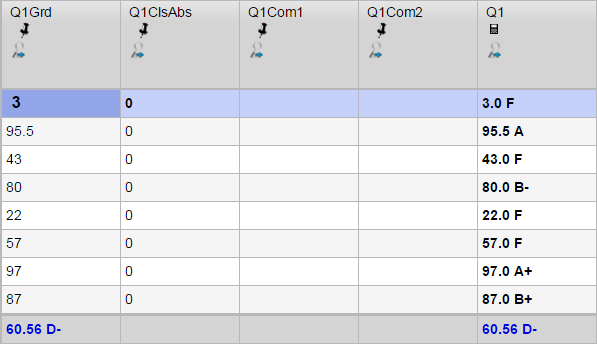
- You should notice that the Q1Grd and Q1ClsAbs fields will now be populated. (as above)
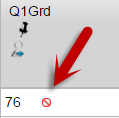
Verifying your Grades
- Verify your grade in Q1Grd against the grade from your Gradebook which is labeled Q1.
- If you would like to change the grade, simply click on the grade in the Q1Grd field and change it. Grades that you have modified will be indicated by a red, crossed-out circle.
Applying the N-Rule (5 or more absences)
- In Aspen, apply the N-Rule using the comment fields
- 100 N-Rule: May lose credit for course due to to attendance issues. Contact school administration.
- 101 N-Rule: Loss of credit, due to attendance issues, under consideration. Contact school administration
What does the pushpin mean? 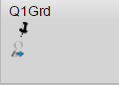
- If the pushpin is black ,
you can enter grades for this column, but you cannot post them to transcripts yet. - If the pushpin is green with a triangle
,
you can enter and post grades for this column. - If the pushpin is red with a square
,
you already posted the information to transcripts. If you need to change a grade, you will be able to repost your grade for 5 days after the report cards are distributed. After that, you will need to complete the grade change form (see Guidance department).
POSTING Grades
Once you have verified the grades, added comments, and applied the N-Rule if
necessary, you can Post your grades. Posting your grades sends a copy of the
grades in the field Q1Grd (and comments) to the report card / student transcript.
grades in the field Q1Grd (and comments) to the report card / student transcript.
- Once the posting period has opened, the pushpin will turn from black to green. The green signifies that you can post your grades.
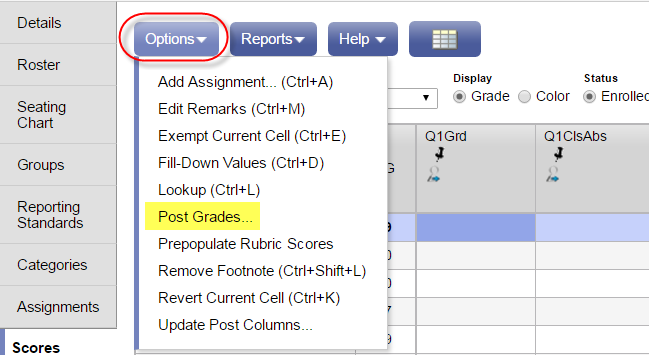
- To Post your grades, click Option -> Post Grades
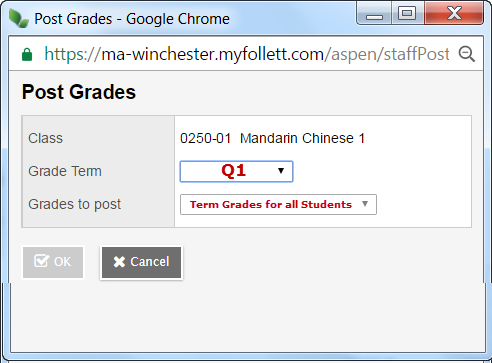
- The Post Grades pop-up will appear.
Fill in - Grade Term = Q1
- Grades to post = Term Grades for all Students.
- Click Ok
- Once your grades are posted, your push pin will change from green to red.
- **IMPORTANT ** You must Post Grades for each class individually.
FAQs
- You may re-post your grades as many times as you please until the posting period ends.
- There will be no printed verification sheets. Instead, you can verify your grades on the Post Columns page of your gradebook (see steps 9 and 10).
- Want a printable copy of this verification page?
- Select Reports -> Gradebook Sheet
- The Gradebook Sheet will appear.
- Click Run.
- The printable version of your Post Columns page of your gradebook will pop-up
- Select Printer icon at the top of the Gradebook Sheet page.
- If you planning on using the same comment field for most of the students in your class, you can quickly add the comment to all students by using Options -> Fill Down Values. Then just change those students who need different comments.

Tuesday, October 30, 2018
Teachpoint - How to create a Request For Professional Days
A teacher recently asked me how they would go about creating a Request for Professional Days online using Teachpoint. Using Teachpoint for these requests is easy. You can follow the steps or watch the video below.
- Go to the PD Tracking icon on the left hand side of the page (Graduation Cap icon)
- Click the New button in the top right of the page
- Select Request for Professional Days
Please also note that the steps for creating Flex Time, Prior Approval of Course for College Credit, and Teacher-Directed/PLC are very similar.
Friday, October 12, 2018
Setting up your Gradebook in Aspen
The video below explains the steps necessary for setting up your gradebook at the beginning of the year or semester.
The first step for setting up your gradebook is entering class details. For information on the details page of your gradebook, see Follett's help guide View and Enter Class Details in the Gradebook.
The first step for setting up your gradebook is entering class details. For information on the details page of your gradebook, see Follett's help guide View and Enter Class Details in the Gradebook.
Thursday, October 4, 2018
Teachpoint PD Help Guides
Would you like some more information about the Professional Development Tracking in Teachpoint? Were you aware that Teachpoint help guides are available to answer many of your questions?
How do I access the Teachpoint Help Guides?
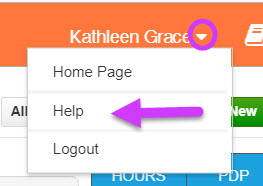
In Teachpoint, click the down arrow next to your name and then click Help.
The Help Guides

How do I access the Teachpoint Help Guides?
In Teachpoint, click the down arrow next to your name and then click Help.
The Help Guides
- FAQ and Announcements: Select Frequently Asked Questions and then Teachers and Evaluators.
Contains information on Teachpoint in general. FAQ's include answers to questions like "I accidently deleted a form/evidence. How do I get it back" AND "How do I change my password?" - Training and Webinars: Includes recorded training on how to use Teachpoint, Short How-To videos, and Getting Started Guides.
- Teachers and Evaluators: Includes information on Getting Started, Forms, and reports.
- Systems Administrators: Information on how to set up Teachpoint and is not needed by teachers or evaluators.
- PROFESSIONAL DEVELOPMENT TRACKING
Checkout the Teacher and Evaluators section. This includes information and help guides on Requesting to attend a PD Event, Request to Hold event, PD Statuses and PD Tracking.

Thursday, September 27, 2018
Print anywhere and everywhere ...
 Ok. Maybe that is a bit of an exaggeration, but did you know that we now have the ability to print to any copier in the district, even copiers not located in your building?
AND
your print job will not print until you are standing in front of the printer. This last fact will make all of your prints more secure.
It's like magic.
How does it work?
All copiers are now outfitted with a "Papercut" card reader located on the top of the copier. This card reader requires you to place your id card on the card reader which will release any print jobs that you have sent to the copier.
Send your job to a printer.
If you are using a district owned device, print your document as you usually would but select the copier as your printer (1).
Which printer should I select?
Most of the copiers in the district are Ricoh copiers. To print to a Ricoh copier, Change your destination to Ricoh Secure Print on VOMS02 (purple circle below).
If your school or department has one of the few Xerox copiers in the district, select Xerox-Universal-Print-Queue on voms02.(red circle below)

How do I get my print job to print from the copier?
If you have never retrieved a print job from a copier before then you will need to register your badge. Place your badge on top of the PaperCut card reader, then use the login and password that you use to get into your school computer (e.g., kgrace). After you have logged in, your badge will be registered in the system and you will be able to print on all Ricoh printers in the district (or Xerox if you are using a Xerox copier).
Now you simply select the jobs that you want to print (see below), or choose print all to print all jobs in the list.

You do not need to rush to the printer to retreive your print job. They will wait for you but not indefinitely. Print jobs are available for 8 hours after you click the print button.
BONUS - Your registered account will also allow you to scan to your email but that is a topic for another blog.
Thursday, September 13, 2018
Google Classroom Updates
Want to learn more about the new Google Classroom updates?
Check out Google's blog on the changes and new functionality.
Time for a refresh: Meet the new Google Classroom
Check out Google's blog on the changes and new functionality.
Time for a refresh: Meet the new Google Classroom
Tuesday, September 11, 2018
Welcome Back 2018-2019
Welcome back to the 2018-2019 school year!
A few reminders:

A few reminders:

- Technology Issues? Put in a Help Desk Request.
To find the Help Desk Request screen, go to this blog
WPS-TechEd.blogspot.com
and click on the Help Desk Request tab at the top of the page.
- Helping students and families reset their Aspen passwords
If parents or students need help resetting their Aspen passwords, please share the document Resetting your student of family portal password in Aspen - Want Aspen Help?
Online help is available in Aspen in the form of user guides, quick reference guides, and videos. Click the Help button on the page that you are viewing and you will be given a variety of options for help. The first option will give you help specifically for the page that you are on. More info: Finding Help in Aspen
- Want to print your rosters? Check out the blog entry:
Aspen - Printing your class roster
Monday, June 18, 2018
How to enter Quarter 4 and Final Grades in Aspen
How to Enter Quarter 4 and Final Grades in Aspen
The steps to entering your Quarter 4 grades is similar to entering grades during any other quarter, but you have the additional step of also adding your Final Exam and Final Grade (FG) for the course.
To Post your Q4 grades in Aspen Gradebook,
- Go to the Scores page in your Gradebook
- In the Grade Columns drop down box, select Post Columns. Also, set the Term to Q4.
(see yellow in image right) - The Aspen Posting columns will appear. These are
- Q4Grd - Quarter 4 Grade
- Final Exam - Final Exam
- Q4ClsAbs - Quarter 4 Class Absences
- Q4Com1 and Q4Com2 - Quarter 4 Comment 1 and Comment 2 fields
- Q4 - The grade from your gradebook for quarter 4
- FG - Final Grade


- Click the Update Post Columns button -OR-
Select Options -> Update Post Columns - This will take you through the Update Post Columns wizard. (see images below)
| |
|  |
Alternatively, you may add an assignment for the midterm grade and then automatically upload that grade by selecting it here.
Your exam will be part of a category and will be part of the Q4 average AND the Final grade. Thus, being factored twice.
| |
|  |

- Click Finish.
- You should notice that the Q4Grd and Q4ClsAbs fields will now be populated.
** Final Exam The field is blank. You will add your Final exam grades into this column on the Post Columns - Term page.
** FG Please note: The grade is calculated using all assignments for the year (or semester for semester courses). It is not an average of the final grade for each semester divided by the number of semesters. Also note: The final exam grade will not be incorporated into this total until you add the final exam grade and click update.

- After you have added your Final Exam(1), click the Update button(2) in the FG column. Aspen will calculate the Final grade for you. ** If the student(s) did not take a final exam, leave this field blank. Aspen will ignore empty scores.

 Pass/Fail Grades. If your class is Pass/Fail, complete the steps in Update Post Columns. This will give you the total absences for the student for the quarter. Then add the P or F into the Q4Grd column. All of the grades will have a red circle with a line through it. This just means that you manually entered the grade.
 Pass/Fail Final Grade. Don't forget to also update the FG field for Pass/Fail Grades. You must manually add the P or F to the FG column.


Verifying your Grades
- Verify your grade in Q4Grd against the grade from your Gradebook which is labeled Q4.
- If you would like to change the grade, simply click on the grade in the Q4Grd field and change it. Grades that you have modified will be indicated by a red, crossed-out circle.

Applying the N-Rule (5 or more absences)
- In Aspen, you will apply the N-Rule using the comment fields
- 100 N-Rule: May lose credit for course due to to attendance issues. Contact school administration.
- 101 N-Rule: Loss of credit, due to attendance issues, under consideration. Contact school administration
What does the pushpin mean?
- If the pushpin is black ,
you can enter grades for this column, but you cannot post them to transcripts yet. - If the pushpin is green with a triangle
,
you can enter and post grades for this column. - If the pushpin is red with a square
,
you already posted the information to transcripts. If you need to change a grade, you will be able to repost your grade for 5 days after the report cards are distributed. After that, you will need to complete the grade change form (see Guidance department).
POSTING Grades
Once you have verified the grades, added comments, and applied the N-Rule if necessary, you can Post your grades. Posting your grades sends a copy of the grades in the field Q2Grd, S1Exam, and MidGrade (and comments) to the report card / student transcript.
- Once the posting period has opened, the pushpin will turn from black to green. The green signifies that you can post your grades.
- To Post your grades, click the Post Grades button -OR- click Option -> Post Grades
- The Post Grades pop-up will appear.
Fill in - Grade Term = Q4
- Grades to post = Term Grades for all Students.
- Click Ok
- Once your grades are posted, your push pin will change from green to red.
- You must Post Grades for each class individually.
HELP! I’m getting an error when I post my grades
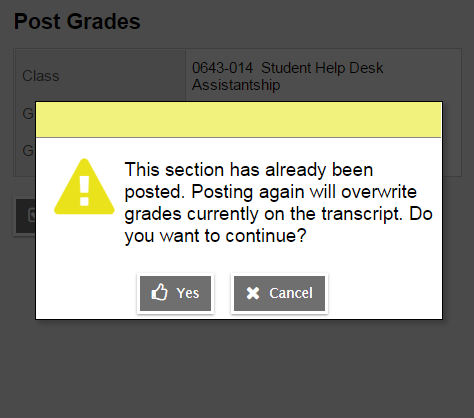
If you get the error “This section has already been posted. Posting again will overwrite grades currently on the transcript. Do you want to continue?”
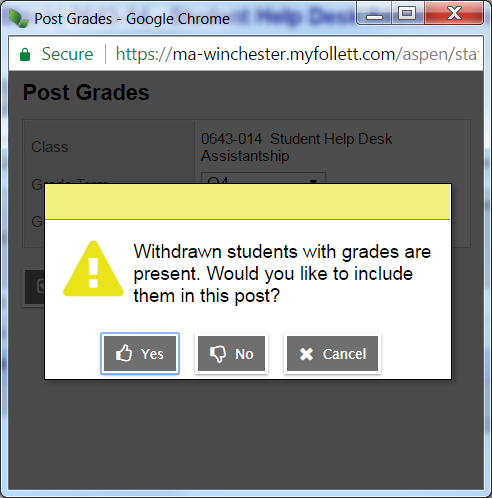
As you continue, you should also receive the error “Withdrawn students with grades are present. Would you like to include them in this post?”
My answer is NO. I have posted my grades for seniors already and do not want to make any changes.
FAQs
- You may re-post your grades as many times as you please until the posting period ends.
- Want a printable copy of this verification page?
Select Reports -> Gradebook Sheet
- The Gradebook Sheet will appear.
- Click Run.
- The printable version of your Post Columns page of your gradebook will pop-up
- Select Printer icon at the top of the Gradebook Sheet page.
- If you planning on using the same comment field for most of the students in your class, you can quickly add the comment to all students by using Options -> Fill Down Values. Then just change those students who need different comments.
There will be no printed verification sheets. Instead, you can verify your grades on the Post Columns page of your gradebook (see steps 10 and 11).
Subscribe to:
Posts (Atom)