Monday, January 23, 2023

WHS Course Recommendations

Course recommendations are once again being completed in Aspen. 

The process for Course Selection is as follows:


  1. Teachers recommend students for courses and levels. 
  2. Students and Parents review the teacher recommendations and select classes for next year in Aspen.
  3. Students meet with Guidance to confirm their selections.
  4. Students receive a list of their courses for next year.  Their actual schedule will not be available until sometime in late August.

How to create your Teacher Recommendations

Set Your Gradebook Preferences to Show Course Recommendations

    SetPreferences-Recommendation1.png
  1. Log in to Aspen.
  2. In the upper right corner, click the triangle next to your name.  A dropdown box will appear.
  3. Click Set Preferences.
  4. Select the Gradebook tab.
  5. Check the Show course selection recommendation checkbox. (This may already be set for you as the default.)
  6. Click OK.
  7. SetPreferences-Recommendation2.pngIMPORTANT: Once you have completed your recommendations, you may want to uncheck this box, as the recommendations drop-down menus take up quite a bit of room in the gradebook window.  You can always see the recommendations again by re-checking the box.


Recommend Next Year’s Courses for Your Students

    CourseRegistration-1.png


  1. Log on to the Staff view.


  2. Click the Gradebook tab.
  3. Select a course, and click the Scores side-tab.
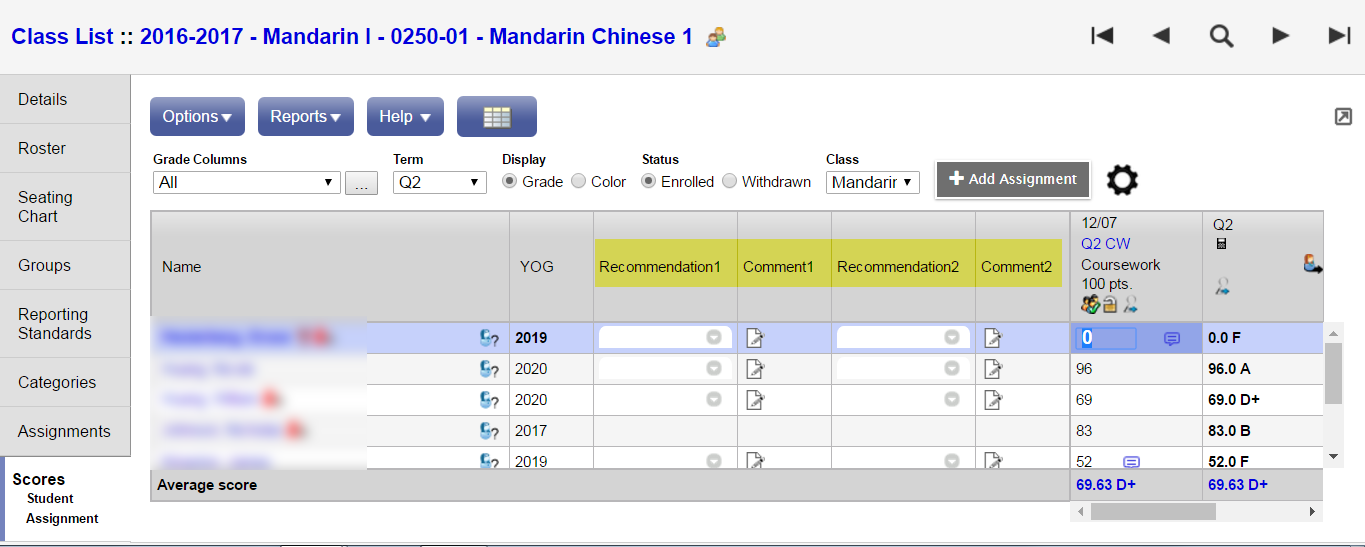
  4. The Recommendation column appears next to each student's name in your gradebook.
  5. You may recommend one or two courses for each of your students.  (Recommending only 1 course is what we advise.)
  6. Recommendation2.png
    Note that you may only recommend courses that are in the same department as the course you are currently teaching the student.  For example, if you are teaching this student Spanish, you may only recommend this student for another course in the World Language department.
  7. To recommend a course for a student, click the down arrow in the Recommendation 1 column.  You will see a list of all courses available (in this case - in World languages).
  8. If you cannot see all of the options in the dropdown, click <CTRL> - This will make everything on your screen smaller and allow you to access those courses that are not visible.
  9. You can use <CTRL> D to fill down values if you will be making multiple recommendations for the same course.
  10. The courses that you recommend for students will be marked as "Recommended."  There is nothing to "post".  Please be sure to let students know to look for that when they log in to select their courses.   (However, student registration does not open for a few weeks.)
  11. Recommendation3.pngIf you want, you can leave a comment about why you are recommending this particular course.  Click on the pencil in the comment column, which will open a dialog box, where you can type your comments. These comments assist Guidance when talking to students about what classes they should take.
    IMPORTANT: Students and parents will see these comments and this field can be used to communicate with students and families.
  12. You can print a report of the courses you have recommended your students for.  Click on Reports –> Course Recommendation.

Quick How-to: Clear Chrome Browser Data

 With the new Aspen update, you are asked to clear your browser data to ensure that your Aspen pages show correctly on your screen.  

This is done easily in just a few steps.

Sunday, January 15, 2023

How to enter Q2 Grades in Aspen

 Adding grades for Quarter 2 is similar to enter Quarter 1 grade. The only difference is the MidYear Grade field which allows semester long classes to add a Final Grade into Aspen.

To Post your Q2 grades in Aspen Gradebook,
  1. Go to the Scores page in your Gradebook
  2. In the Grade Columns drop down box, select Post Columns.  Also, set the Term to Q2.  
  3. The Aspen Posting columns will appear.  These are
    • Q2Grd - Quarter 2 Grade
    • S1Exam - Semester 1 Exam
    • MidGrade - MidYear Grade
    • Q2ClsAbs - Quarter 1 Class Absences
    • Q2Com1 and Q2Com2 - Quarter 1 Comment 1 and Comment 2 fields
    • Q2 - The grade from your gradebook for quarter

  4. Click the Update Post Columns button -OR-
    Select Options -> Update Post Columns
  5. This will take you through the Update Post Columns wizard.  (see images below)


    • Step 1. Select the Grade Term (Q2) and the Grades to update (all students).

    Q2PostColumns2.png
    • Step 2. Select
    • Quarter 2 Grade = Average:Q2  
    • Mid Term Grade = District Calculation
    • Q2 Class Absence= Class Absence Total


    • Step 3. Confirms the choices made in Step 1 and Step 2.
    Q2PostColumns4.png


  6. Click Finish.

  7. You should notice that the Q2Grd and Q2ClsAbs fields will now be populated.

    ** MidGrade The grade is equal to the Q2Grd. This field is most important for semester long courses as it will contain the Final Grade for these courses.


  8. Aspen will calculate the MidYear grade for you. 
    If you make any changes to a students grade in the Q2Grd field, click the Update button in the MidGrade column to recalculate this field and have the grade change reflected in this final grade.

    If you give Pass/Fail grades for your class, please enter P or F in the MidGrade field.

  9. Add comment codes (see WHS Comment Codes)

    Verifying your Grades
  10. During the update, Aspen moves the grade from your gradebook (labeled Q2) to the report card (Q2Grd). You may verify your grade by comparing these two grades.
  11. Verify your grade in Q2Grd against the grade from your Gradebook which is labeled Q2.


Wednesday, January 11, 2023

Chrome: Sharing Links

Were you aware that you can easily share links from chrome on your computer to your phone or to another device that you are logged into?

Chrome offers an easy way to share links across devices that you are using.  When you find a link you want to share, simply click on the Share Link icon on the right side of the address bar.    

  1. Share
    Icon
    Click on the share icon 


  2. Select the option - Send to your devices


  3. A pop-up window will list other devices in which you have recently been logged in.  Notice the choices below are for a phone or another laptop, but this works also for tablets and chromebooks.


  4.  If this did not work for you, you should make sure that sync is enabled in Chrome.  You can do this by clicking on the person icon next to the 3 dots on the menu bar.  


  5. Set Sync to ON by clicking on the Sync line.  This will open your Chrome settings and allow you to turning Sync on.   
    Having Sync on allows you to Sync your apps, bookmarks, extensions, history, settings, theme, open tabs, passwords, and more across the machines that you use regularly.  If you are using a device one-time, you do not need to set Sync on unless you need it.