Thursday, February 27, 2014

Making the Move to Gmail from First Class

Are you primarily using your new Gmail account rather than your old First Class email? 


If your answer is yes, there are a few things for which you must consider.

  1. Winchester Public Schools is not moving to First Class until this summer. Therefore, many teachers / staff / administrators will continue using First Class until then.

    In order to insure that your emails are received by others in the district, please continue to send emails using the k12.ma.us email address.


    If you know that the email recipient is using Gmail, go ahead and use the winchesterps.org email address.  But if there is any question as to which email address to use, then use the k12.ma.us address.
      
  2. After you move to Gmail, you will need to continue checking First Class emails that are sent to conferences.

    For example, at the High School, the principal will share important information with the staff in the High School folder.

    Please remember to log into First Class to check your conference folders.
      
  3. Sending emails from your gmail account to your own k12.ma.us email address will force a NDN error (see below).

  4. Don't panic.  Only you will receive this error message and you will also receive the email that you sent. 

    To prevent receiving these errors,  simply do not send emails to your k12.ma.us account.  This should not be a problem because Gmail does an excellent job organizing your emails and you will find that your sent emails will be easy to find.


Tuesday, February 25, 2014

Google Sites and Chrome for Dummies

The 2009 version of the book Google Sites and Chrome for Dummies is available online at the IT E-books site.  

Although it is 5 years old, and some things have changed, the book may help to answer some questions about how to use the Google Chrome Browser AND / OR how to create your own Google Site.

I have given the book a very quick look and it looks pretty good.  You can check it out at it-ebooks.info/book/511/.  

Tuesday, February 18, 2014

Setting up your Gmail Account -- Inbox Settings

The way that you view and experience Gmail is individualized through the use of different settings.  Because we are all different and may prefer the way that we view our mail, Gmail offers different display settings for your inbox.  

Nothing is set in stone.
If you choose a setting and later decide it is not working for you.  No worries.  Go back to your Gmail Inbox settings and try something else.  

Google Inbox Settings
To access your Inbox settings, click on the Gear in the top right of your Gmail page (see right) and then select Settings from the dropdown box.

At the top of the Settings page you will see the menu bar below.  Select Inbox from the menu bar.


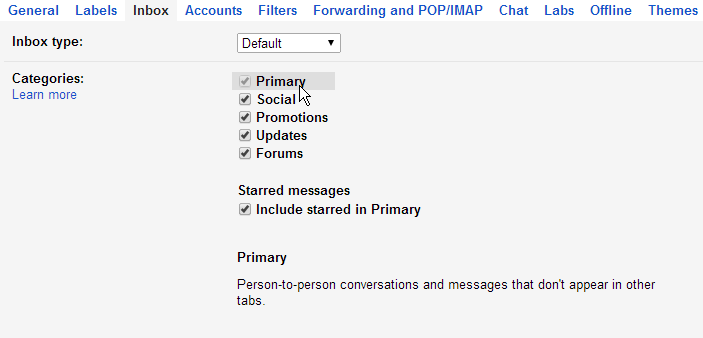
The Inbox Menu will look like the image below.


Inbox Types
The first and most important setting that you will encounter is the Inbox Type.  Here you have 5 choices.  You may select Default, Important First, Unread first, Starred first, Priority Inbox.  You access the choices by clicking on the small arrow in the right side of the box.


Default Inbox

The default inbox allows you to separate your email into different categories. There are 5 default categories.  You may choose all of the categories, or a combination of any of them.


What do the different categories mean?

PrimaryPerson to Person communications and conversations that don't appear in other tabs.
SocialMessages from social networks, media sharing sites, online dating services, and other social web sites.
PromotionsDeals, offers, and other marketing emails.
UpdatesPersonal, auto-generated updates including confirmations, receipts, bills, and statements
ForumsMessages from online groups, discussion boards, and mailing lists.

Note:
As we move to Gmail, the Forums area will become something like conferences in First Class.  Any group that you belong to (e.g., High School English, High School, WAG 10th grade, News), will be separated out into the Forum section.

Important First
Important FirstBoth you and the sender of an email may flag the message as important by clicking on the important icon (see right).
By choosing Important First, all emails that have been flagged as important will be shown first.  All other emails will be put into a section called Everything Else.

Note: 
Because others can mark their emails as important, you may find that many emails are marked as important that in your mind are not important.  This can lead to many emails in the first section that you may not want there.  You can remove these emails from the important section by clicking on the important icon shown above.


Unread First

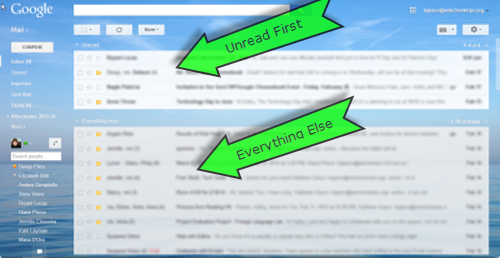
With Unread First, all of your unread emails are shown at the top of your screen.  This allows you to quickly see any new emails that might need your attention. 

Note:
You may keep an email in the top section after it has been read by marking it as unread.  In this way, you may keep an email that is older in the top section because it needs your attention.


Starred First

Starred First is very similar to Important first except only you can Star an email.  In this way, you can decide which emails are important or need further attention. 

An email is starred by clicking on the star next to the Sender name in the inbox.  
   

Priority Inbox

The Priority Inbox allows you the most customization choices available for your inbox.  

The Inbox Section allows you four sections in which you may decide what types of emails to show. 

In the image right, the first emails that will be shown are Important and Unread.  However, by clicking the Options link to the right of this choice, you are given additional choices for customization.  These choices include many of the options described above, the number of emails to show in this section, whether or not to show section if it is empty, and the option to remove the section.  This is true for all of the other sections as well.


As you can see, there are many options for configuring your inbox.  No one way is the right way.  It's a matter of personal preference.  Take some time and try a few different configurations and find out which one is right for you.

Finally, don't forget to click on the Save Changes button at the bottom of the page or none of these changes will take affect.


Thursday, February 13, 2014

Google Drive Basics - What Do The Icons Mean?

As you start to use Google Drive, you will encounter icons that indicate different file types.  Here is a quick guide to what the icons mean.

Google Drive Icons
Google Drive Create Button

Google Apps for Education allows you to create documents, spreadsheets, presentations, drawings and forms from your Google Drive.  These file types are created when you click on the Create button in Google Drive (see right).

The icons associated with these file types can be found below.


Google Drive file types

Icons for Other File Types

Google Apps for Education also allows you to upload files to your Google Drive.  These files may be from Microsoft Office, Adobe Acrobat or other external applications.  

The icons that Google uses for these file types are as follows: 

Icons for non-Google Apps files

Where will I see these icons?

You will see these icons next to your file name in your Google Drive (see below).  By knowing what the icons mean, you can quickly determine what kind of file type you have in your Google Drive.  


You can learn more about Google Drive Basics at Georgia Southern University's web site.


Monday, February 10, 2014

Accessing your Gmail Account is as Easy as 1-2-3.


Now that you have received your new Gmail account, you may be a little confused about how you get to Gmail the next time you want to login.  It is not difficult if you follow the steps below.

Step 1.  Open your browser.
You may access your Gmail using any browser that you choose: Internet Explorer, Firefox, or Chrome.  The choice is up to you, but I recommend Chrome because it, too, is a Google product.

Start your browser and open your Google search screen (i.e., surf to Google.com).  

Step 2. Sign In.

If you have not logged in already, you will see the screen below.


In the the top right of the screen, you will see a blue Sign In button (see above in red box).  Click on the Sign In button.

If you are already signed in, you will not see the Sign In box.  Instead, you will see your username in place of the Sign in Button.  Continue to Step 3.

If you have logged into Gmail on the computer before, you should see a screen similar to the one below.  In this case, I would click on my name to log into my school account. 


If the account listed in this screen is not my account, I would click on Add Account and follow the steps below.

If you have never logged in using your Google account on the computer, you will receive the screen below. Type in your username and password and click Sign In.


Step 3.  Go to Gmail.
When you are logged in, the sign in button on the Google screen changes to your Gmail account address (see red box below).


Accessing Gmail once you are logged in can be done by clicking on the word Mail in the top right of the Google search screen.  

You may also access Gmail by clicking on the Google bar icon  .  
This icon, located in the top right corner of your screen allows you to easily switch between many different Google products with just one click.  For example, when I click the Google bar icon, I'm given the screen below.  Here I can access google search, Gmail, Google Drive, Google Calendar, Google Sites, Google Groups, and my Contacts.  


Click on the Google Mail Icon to access your email account.
As you can see, getting your Gmail is as easy as 1-2-3, no matter where you are and no matter what computer your are using.


Thursday, February 6, 2014

Need Help in the move from FirstClass to Gmail?

During Tuesday's training session with Andy Marcinek, he mentioned the web site that he and his group created to answer many of the questions that people in his district had with the move from First Class to Gmail.  

The web site is GDRSD EdTech Commons and can be found by googling GDRSD. To make it easy, you can also click here - GDRSD EdTech Commons 

Wednesday, February 5, 2014

Setting up your Gmail Account - General Settings

Now that you have your new Gmail account, you may want to personalize your Gmail desktop.  This is done via Gmail settings which you access by clicking on the gear icon (right).

Select the Settings option.

At the top of the Settings page is the navigation menu below:


By clicking on the General tab, you can modify the following settings:

Text Style.  You can decide the font, text size, and color of your outgoing messages by changing the Default text style.


    Desktop Notifications. Do you want people to be able to instant message you when you are in google?  If you do, make sure that Chat notifications is set to on.  Would you like a sound to indicate that you have a new message?  These settings are established by the buttons labeled Desktop Notifications.


      Profile Picture.  I think it is a great idea to set your profile picture.  This is your professional account and it is helpful for the people whom you will be communicating with from this account (e.g., teachers, admin, parents, students).  You have the choice of making this image available to everyone, or only those people with whom you chat.


      Email Signature.  Because this is your professional account, you should include a professional signature at the bottom of your email message.  Include your title, department, school, and contact information. As a teacher, you might consider including a link to your class web pages, blog, or twitter page.


      Vacation responder.  If you are not going to be available whether through vacation, illness, or perhaps family leave, this is a great place to let people know that you will have limited availability to your email and whom else they may want to contact while you are away.


      The above is just a summary of some of the settings under the general tab. When you access the settings, you will see the other settings that you can modify. You will also notice that Google does a great job of providing information regarding the purpose of the additional settings where you can learn more about them.

      Gmail Inbox Settings
      To find out more about configuring your Gmail Inbox, check out the Gmail Inbox settings blog entry.

      Tuesday, February 4, 2014

      What is Cloud Storage?

      What is cloud based storage and why do I need it?
      If you use more than one computer (work laptop, home computer, smartphone, tablet), you often want to access the files on one computer while you are on another computer. 

      Online cloud storage applications allow you to share your files between devices (and between people). It also offers synchronization - meaning that if store a file in the online storage folder on one computer, the application will automatically update to your other devices.

      So, instead of storing your information on your hard drive or carrying around a flash drive, you store your information in an internet drive.  Because the information is available through the internet, it is available any where that you have access to the internet.

      As a Google Apps for Education school, we will have access to a Cloud Storage system called Google Drive.  Google Drive can store your pictures, documents, spreadsheets, presentations, etc. 

      How safe are your files in Google Drive?
      When you go to Google Drive in your browser, notice that the URL in the address bar will begin with https:// rather than http://.  The "s" stands for secure and tells you that a secure communication protocol is being used to transfer your file from your computer to the server and back.  Any data being sent is encrypted so that it cannot be stolen as it travels the internet.

      However, this security does not extend to the file being stored on Google's servers.  The files located on drive are secured via your password.  So choose a strong password and don't share your password with others.  

      If you would like to read more about Cloud Computing, check out the article below.


      Monday, February 3, 2014

      Organizing Your Gmail Inbox Using Folders

      You may have been using folders in your First Class to organize your email.  Gmail also offers this capability.  

      Select the emails that you would like to place into a folder by checking the box next to the email.

      Click on the folder Icon.  

      • Folder already exists.
        If you have already created the folder, you simply choose the folder name.
        For example, If I wanted to store these emails in the folder Winchester 2013-2014, I would click on that folder in the picture on the right.
      • Folder does not exist.
        If the folder does not already exist, click on the words
        Create New.
        • The New Label window will appear.  Type in the name of the folder you would like to create.  In this case, it is Attendance.

        • If you would like to store this Attendance folder as a sub-folder, e.g., perhaps you wold like to store it within the Winchester 2013-2014 folder.
        • To create a sub-folder, click on Nest label under box and select the parent. 
      • Click Create to create your folder.
      After completing these steps, your folder will appear in your left navigation area under your Inbox.