Thursday, November 7, 2024

How to Enter Quarter 1 Grades in Aspen (2024 update)

 How to Enter Quarter Grades in Aspen


Your Aspen gradebook is similar to the paper gradebook that we all used to use.   It’s a private document that only you can see. At the end of each quarter, your student grades and comments must be posted to make them visible to the school and district.

At the beginning of the school year, you should have set up your gradebook details.  The Details page allows you to create your average mode, set up categories, and link classes. To learn more about setting up your gradebook details, see my blog entry Setting up your gradebook in Aspen.

To Post your grades in Aspen Gradebook,


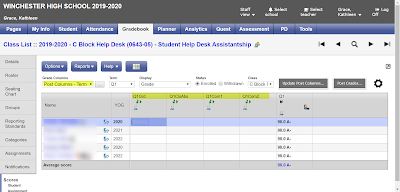
  1. Select your first class in your gradebook. Click on the Grade Columns dropdown and select Post Columns - Terms.
  2. The Aspen Posting columns will appear. These are
    • Q1Grd - Quarter 1 Grade
    • Q1ClsAbs - Quarter 1 Class Absences
    • Q1Com1 and Q1Com2 - Quarter Comment 1 and Comment 2 field
  3. Select Options -> Update Post Columns
    PostGrades2.png
  4. This will take you through the Update Post Columns wizard.
      • PostGrades3.pngStep 1. Select the Grade Term (Q1) and the Grades to update (all students).
      • Click Next


    • PostGrades4.png
      Step 2. Select
      • Quarter 1 Grade = Average:Q1
      • Q1 Class Absence= Class Absence Total
      • Click Next
      PostGrades5.png
    • Step 3. Confirms the choices
    • Step 1 and Step 2. 
      Click Finish
       

  5. The Q1Grd (Q1 grade) and Q1ClsAbs (Q1 Class Absense) fields should now be populated. The Q1 total field from your gradebook has been copied to the Q1Grd field.
  6. Add comment codes (see WHS Comment Codes) in Q1Com1 and/or Q1Com2


Verifying your Grades
  1. Verify your grade in Q1Grd against the grade from your Gradebook which is labeled Q1.
  2. If you would like to change the grade, simply click on the grade in the Q1Grd field and change it. Grades that you have modified will be indicated by a red, crossed-out circle
  3. PASS/FAIL Courses If your class is being taken as a Pass/Field, you should change the Q1Grd field from a number to a P or a F. To change the entire column at once, add the P in the first students Q1Grd field and then click CTRL-D. Note the red, crossed-out circle next to the grade. This simply indicates that a modification to the grade was made by the teacher.


black-pushpin.pngWhat does the pushpin mean?
  • If the pushpin is black ,
    you can enter grades for this column, but you cannot post them to transcripts yet.
  • If the pushpin is green with a triangle ,
    you can enter and post grades for this column.
  • If the pushpin is red with a square ,
    you already posted the information to transcripts. If you need to change a grade, you will be able to repost your grade for 5 days after the report cards are distributed.  After that, you will need to complete the grade change form (see Guidance department).

PostGrades8.png

POSTING Grades
Once you have verified the grades, added comments, and applied the N-Rule if necessary, you can Post your grades. Posting your grades sends a copy of the
grades in the field Q1Grd (and comments) to the report card / student transcript.
  1. Once the posting period has opened, the pushpin will turn from black to green.  The green signifies that you can post your grades.
  2. To Post your grades,  click Option -> Post Grades
  3. PostGrades9.png
    The Post Grades pop-up will appear.
    Fill in
    • Grade Term = Q1
    • Grades to post = Term Grades for all Students.
  4. Click Ok
  5. Once your grades are posted, your push pin will change from green to red.
  6. **IMPORTANT ** You must Post Grades for each class individually.


FAQs

  • You may re-post your grades as many times as you please until the posting period ends.
  • There will be no printed verification sheets.  Instead, you can verify your grades on the Post Columns page of your gradebook (see steps 9 and 10).
  • Want a printable copy of this verification page?  
  1. Select Reports -> Gradebook Sheet
  2. The Gradebook Sheet will appear.  
  3. Click Run.
  4. The printable version of your Post Columns page of your gradebook will pop-up
  5. Select Printer icon at the top of the Gradebook Sheet page.

  • If you planning on using the same comment field for most of the students in your class, you can quickly add the comment to all students by using Options -> Fill Down Values or CTRL-D.  Then just change those students who need different comments.

Friday, October 4, 2024

5 Useful Google Tips


 Here are 5 useful Google Tips to help you in your classroom.


  1. ChromeCalculator.png
    Calculate numbers using the Google Search Bar in Chrome Calculation totals will appear just below your equation OR hit return to have the scientific calendar appear (see right).
  2. Use Google Classroom Rubrics You can create, reuse, and grade with rubrics for individual assignments. Rubrics are exportable so that you can use them with multiple assignments and/or share them with other teachers. Import rubrics using Google Sheets - Checkout the Template: Alice Keeler’s Rubric Google Classroom Template
    Some important info about the rubrics:
    50 criteria/rubric 
         Up to 10 performance levels per criteria

  3. Google Classroom - Assign different content to different students. You can select "All Students" or choose specific students to include in the assignment by checking the box next to their names. You can create similar assignments for different students by clicking on "reuse assignment" to create a new assignment. Just change the wording to meet the needs of the different student group.
  4. Google Drive Organization To better organize your Google Drive, try color coding folders so that you can quickly locate them. You can also add emoji's to the folder name which also makes it easier to locate. To color code your folder, right click on the folder in Google Drive and select Organize then select the color for the folder.
  5. Chrome function keys Use the <CTRL> key + letters below for the functions: N: New Window T: New Tab Z: Undo the last thing you typed C: Copy V: Past X: Cut Use <CTRL> + <Shift> + Letters for the following functions: T: Reopen last closed tab R: Reload the current page W: Close the current window

Thursday, September 5, 2024

Aspen Sign in 2024

There is a new procedure for signing into Aspen this year.  The new procedure uses your school Google credentials.  


To log in select - Login with Another Provider.


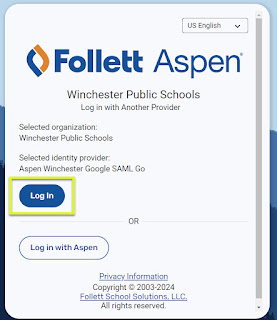
This will bring up the second screen which selects your Google login credentials.  As long as you are already logged into your school Google account, you will be able to just then click Log In (as below).


FAQ's

What if the Log in with Another Provider does not appear?

If you do not see the option to choose another provider, you have a couple of options to try.
image.png
  1. Clear your browsing data
 To clear browsing data:
On a WPS laptop while in Google Chrome: Ctrl + Shift Del 
On a WPS chromebook while in Google Chrome: Ctrl + Shift backspace

Then press the Delete Data button.


2. Choose another browser.
For other browser options, all WPS laptops have Edge and Firefox as alternative browsers. 

What else might I be doing incorrectly?
Using your email address in the Login ID box. 
The current login process is using the "Log in with Another Provider" button, then "Log In" button, which then authenticates with Google. If you do not see these buttons, please try the troubleshoots.


If you need additional help, please do not hesitate to ask your ITS.