Tuesday, December 13, 2016

Google Forms for Online Quizzes


In June, Google released updated Google Forms to allow for auto-graded quizzes, These quizzes are easy to create and allow you to not only quickly gain insights into class performance via automatically generated stats like a summary of responses, frequently missed questions, average, median, and range of scores, and graphs marked with correct answers.


To create a quiz, create a new form and then click the settings widget (1).  
Next, click Quizzes (2).

Then be sure that the slider next to Make this a quiz is set (3).

Quiz options include 

  • the ability to release grades immediately after the student submits the quiz, or you may wait and send grades after you have manually reviewed the quiz.
  • The ability for the student to see missed questions, correct answers, and point values.
As you write your quiz, you will be able to assign points for each question and develop an answer key by selecting the correct answers for all question types (except grid questions).  You may also add explanations to answers.  These explanations may include links, videos, or websites.

Responses
Quiz responses can be viewed as a summary of all responses or by individual response.  A response summary is automatically generated.  

  • The Summary includes insights (average, median, range) and total point distribution.  Frequently missed questions are also singled out for your review.  Answers for all responses are then displayed visually using bar graphs and pie charts.  This visual display allows you to see trends in your data.
  • Individual Responses allow you to review each students responses and to hand grade the assignment.  So, if you have fill in the blanks, or short essays - no problem.
Choose when to Release Grades
Student grades can be sent immediately after they finish the exam, or you may release them after a manual review.  You choose the timing in settings.  
To manually send ALL grades, choose Summary then scroll down until you see Scores and click Release Scores.

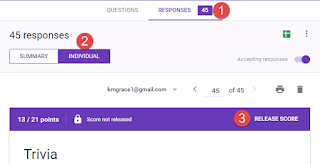
To manually send an individual grade, select Responses -> Individual and then click on Release Score.


Creating the online quiz in Google Forms takes a little bit of time, but grading is easy and the information that you can?get back on the assessment is priceless.  Why not check it out.

Thursday, December 1, 2016

In-district Technology Grants - DUE January 5, 2017

We are happy to announce that WFEE has made another contribution to PowerED UP, which allows us to send out another round of in-district technology grants!

These will be due January 5, 2017

For the secondary level schools, the focus will be on innovation and trying new types of technology, and less on student devices.  For the middle school, student devices for the classroom will not be part of this round, and for the high school there will be a limited number of student devices allowed (based on the BYOD being fully rolled-out at middle and piloted at high school).  Elementary grants will be open for student devices and innovative technology.

Based on funding, please keep in mind that requesting a "class set" of anything will not be awarded.  If after reading through all of the attached documents, you have any questions, please let me know.  However, please do not send me your grant, as this is a blind scoring process.  Please submit the grants to:   https://goo.gl/forms/lJJcbyAGqKYdLZEo1      

No grantswill be accepted through email, hard copy, etc.  They MUST be submitted through the googleform (this allows us to make sure that none are lost in processing and that none of the people blind scoring will see the grants ahead of time).  Based on feedback we have: changed the submission process, streamlined the form, attached a sample, and are encouraging people to apply as a grade level or team.  We also want to emphasize that we do not expect the grants to be lengthy (1-2 pages), and that most people are asked to do no more than 6 hours of professional development (which can be delivered during half-days, summer workshops, faculty/dept/grade level sharing, common planning time sharing, helping an individual colleague, presenting on tech night, etc.).  

Thanks you!

Attachments:


Thursday, November 17, 2016

Don't forget to POST

If you need to make any changes to the grade reported on your gradebook, don't forget to POST the grades. 
  • You may Post any number of times
  • Posting sends a grade to the report card


Report Card Analogy
The Post-Columns Term page of your gradebook can be thought of as a piece of paper listing the grades that you are reporting to the office.  On this paper, you will 
  1. report the grade that you want the student to receive
  2. the number of absences for the class
  3. comments that you would like to share about the student
Any time that you change this information - for example, increasing a student grade or adding comments - you update the form.  

But making the change to the form is not enough.  To get the grade to the office, you must click on the POST button.  Otherwise, it will just sit on your (Aspen) desk.

ADD your email address under the Follow Blog by Email heading in the right hand side of this blog to have automated delivery of each new blog entry

Tuesday, November 15, 2016

Viewing Student Grades After They Have Dropped The Class

You may have a student(s) who switches out of your class but later need to view their grades.  Finding these students and their assignment grades is easy in Aspen.


  • Click on the Gradebook tab.
  • Click on Scores in the left hand navigation.
  • Then click on Withdrawn under the Status.


ADD your email address under the Follow Blog by Email heading in the right hand side of the blog to have automated delivery of each new blog entry

Wednesday, November 9, 2016

Pass/Fail Grading

Pass/Fail Grading in Aspen is EASY.

Adding a Pass Fail Grade to an Assignment

To give a student a P(ass) grade on a single assignment, simply type in the letter P in the place of a number grade in the assignment column.

Similarly, you would add an F for a student who Failed the assignment.


Adding a Pass Fail Grade for the Quarter
After Updating Post Columns, change the grade (which may be blank) to a P or F.  Add comments and then click the Post Grades button.  


ADD your email address under the Follow Blog by Email heading in the right hand side of the blog to have automated delivery of each new blog entry

Wednesday, November 2, 2016

Releasing a Document from the Universal Printer

Once you activate your badge, you can print from your computer:
  • File
  • Print
  • click CHANGE printer
  • choose District Universal Copier
  • (If you don't see it, you might have to click Show All)
  • Select Print
Your document will wait for you in the copier. It will not print.

Only you can print your document by swiping your badge over the printer.


  1. Go to any copier in the district and swipe your badge over the SCAN CARD HERE

https://lh5.googleusercontent.com/iZPwToVyLzd0ywK85OWF7NCTr6EpUpKVFps-zYYt7BljUlTQP4uhe0GJdvDOG6N8M6p-TtE4I8JQ0mfj8PgrzxCFt1hmgE6LVIoxKccXLk-3lahn5gy2_rYXi91xklE7pa4mrAAd
  1. Only your documents will show up.

  • You can choose which document/s to print or print All

  1. If you choose All, all of your documents will automatically print


  1. If you choose a document, you will have to click on Print
  2. You can return to the copier from this screen if needed

                            
  1. You can delete anything in your queue from this screen by choosing the document and click Delete
  2. Your documents will stay in the queue until you print or delete

ADD your email address under the Follow Blog by Email heading in the right hand side of the blog to have automated delivery of each new blog entry


Tuesday, November 1, 2016

Gradebook: Are your students and parents seeing class statistics?

Would you like to share statistics about the high, low, and median score assignments for each assignment?

  1. In the Staff view, on the settings bar, click Set Preferences under your user name.
     
  2. In the Set Preferences pop-up, click the Gradebook tab.
     
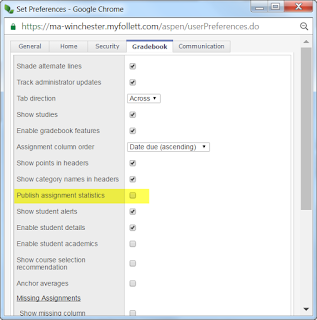
  3. Scroll down to the Publish Assignment Statistics box and check it.
     
  4. Alternatively, if you DO NOT want your students and parents to see these statistics, make sure the box is unchecked.
Publish assignment statistics

  1. Select this checkbox if you want low, median, and high assignment scores to appear for parents and students when they view grades using the Family and Student portals.

ADD your email address under the Follow Blog by Email heading in the right hand side of the blog to have automated delivery of each new blog entry

Saturday, October 29, 2016

Aspen: Printing Student Gradebook

Image 1
If you would like a printed copy of your Aspen Gradebook worksheet, 


  • Select Gradebook tab
     
  • Select the course
     
  • In the left hand navigation options, select Scores
     
  • Your gradebook will appear on the screen.
     
  • Select Reports -> Gradebook Sheet
    (image 1)


Image 2
  • The Gradebook Sheet (image 2) will appear.  Click Run.


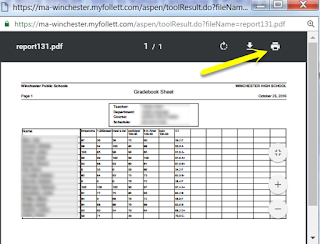
  • The printable version of your gradebook will pop-up (Image 3)
     
  • Select Printer icon at the top of the Gradebook Sheet page.


Wednesday, October 26, 2016

Activating Your ID Badge to Universal Copiers

In order to print to the universal printer/copiers you must 1st activate  your ID badge. To activate, bring your ID badge to one of the universal printers, and follow the steps below:
  1. Press the Services Home button on the printer.
           
https://lh5.googleusercontent.com/t8wLT_ApnnNFboio6OQ961krMCsrYCrSL3LbFB4xd3Sr9dQWLk2rwxOZhT5YhJWOhg08eHt8NadcsdQ74dMgIhSJ5-BXykuuZ_TYCyLXypUdJqc-Lsbgq1dfI2wf37b0veqfl86x
  1. Swipe your badge over “SCAN CARD HERE”
  • Try it face up and then face down
  • You will hear a beep once scanned correctly

https://lh5.googleusercontent.com/iZPwToVyLzd0ywK85OWF7NCTr6EpUpKVFps-zYYt7BljUlTQP4uhe0GJdvDOG6N8M6p-TtE4I8JQ0mfj8PgrzxCFt1hmgE6LVIoxKccXLk-3lahn5gy2_rYXi91xklE7pa4mrAAd
  1. Associate Card screen
  • Press Yes

https://lh5.googleusercontent.com/9yyvNhtH1CA1TsPDxrZFioMzbAB37L2kfCkuXU_UTh7bqhoplilu5uWZ3S-d3p1hSoTOroQpfZB7uJs5SOlxtfud4QoQcLawZ7MDNVs_B4GlDE0tyT9U2XVXQrzq-UecaP9GWeGZ

  1. Associated Card – Username
  • Enter your computer login username (ex) jdoe, press done

https://lh5.googleusercontent.com/tBzFfBbaMvvUQslznLswBDpec2JjDIgz6K82Y9kUCoQBzRnkSDHCl_9KtrHYxPde46UnN-nnf-H_yFQQvIx4Zh3vLKBPhDwjXrHcg6F-nvAVLntjzFQv7DuSgx7Q3ddmv4hPDy9e

  1. Associated Card – Password
  • Enter your computer login password, press done

https://lh4.googleusercontent.com/_wcGkn075AHz9e4GCX4FupuBzby0tUvByfxBxf0-CTsx2Go30rT9gP9K6xPaz_WVKhgoxmbZK-6k07bCac56UtDWk4waRp_hExpyOqF4Mb0uwcOQqFZeEQNp7klDIQOmZ-atGXeU

  1. Card Associated – Successful
  • Press Yes

https://lh4.googleusercontent.com/J-lQLJkXkWj1W1kWeD_0d4z2kZ-ZE8--Qod8qU5hi1JCIm04D-35bZVYI7iGTqtKJljJp2f49ZjiwKua_IgM7mO5tiXqIiz6vau2BBc6YtjntxXpAmLY3Y3_SE5dHJZbnqkiWkoN
  1. Logout

Option 1:  You can swipe your badge over the “SCAN CARD HERE”

                          Option 2:  Press the Logout button

Updating iOS on an iPad

How to Update iOS on an iPad

*Before you update, make sure your iPad is charged more than 90%.
  1. Launch Settings from your Home screen.
  2. Tap on General.

  1. Tap on Software Update.
  2. Tap on Download and Install.
  3. Enter your Passcode, if prompted.
  4. Tap Agree to the Terms and Conditions.
  5. Tap Agree again to confirm.

This may take a while to finish. Do not power off the iPad until it is done.
*If you have a recent update, it will ask if you want to update overnight. This is okay, but keep your iPad plugged in.

*The more often you update, the less time it will take in the future.

Monday, October 24, 2016

Aspen: WHS Teacher Attendance Information


You can view detailed information about a student’s attendance by clicking on the student’s name in the master student list and then clicking on the attendance side tab.  


Check for E(xcused)
Anything marked with an E (A-E, D-E, and T-E) indicates that the absence/dismissal/tardy is excused.  Check the description under "reason" to determine if the reason is one that qualifies under the "exemptions to the N rule" list.  

School Attendance is recorded during second period
Second period class attendance records school attendance.  You can choose anytime during the entire second period class to enter attendance.  That is, you can enter attendance at the beginning of class or wait until the end; the choice is yours to make.  

How to change School Attendance
You can update your class attendance by re-entering it, but this does not update school attendance.  To make a change to school attendance after you have posted attendance, you MUST email Cindy. Again, you now have until the end of second period to record attendance.

*** Inputting it at the end of the block is one way to avoid having to email updates after the fact.  

Parent Notification when Absent or Tardy
As a matter of best practice, parents need to be contacted when kids are coming late/absent to class.  The first a parent hears about class attendance issues shouldn’t be when the N rule is happening.

When a student has been absent unexcused from your class, contacting home to check "to see if X student is okay" is a great way to build a connection/relationship, and when kids know we are checking up on them, they are less likely to skip class.

Where to get help
If you need help with attendance in Aspen, please see Kathy Grace, Paula Conis or Dennis Mahoney.   If you are unsure about a student’s attendance status, see the appropriate guidance counselor, assistant principal, or Cindy Gallagher.  

N-Rule
According to the student handbook (p.14), all absences count towards the N rule except the following:
  • extended illness with medical documentation
  • college visits 
  • bereavement
  • field trips
  • suspensions
  • exemptions granted by the principal
  • religious and ethnic observances

Thank you to Paula Conis for the content of this blog.

Monday, October 17, 2016

Aspen Quick Reports

Aspen has a lot of useful information for teachers about students. For example, teachers can look up student emails, emergency contacts, and No Photo lists. These directions are specific to the No Photo list, but can be used for many other types of useful information:

Creating a Quick Report to show the class No Photo list
  1. Click on your Student tab.
  2. Click Reports
  3. Choose Quick Report.
This will bring up a pop-up for you to start making choices.
5. Choose New Report
6. Keep it on Simple
Then in the left box (Available Fields), you will be prompted to add the resources you would like to add to your report.
If you click the A/Z box, it will alphabetize the choices for you.


7. Scroll down to choose PHOTO RELEASE
8. Click the button.
9. Choose First name, Last name...any other information you would like to add to your report, and click the ADD button again.


If there is anything in the box on the right (Selected Fields) that you do NOT want, choose it and click the REMOVE button.


By using the UP and DOWN buttons, you can place your selections in the order you want them to appear in your report.


10. Once your Selected Fields box shows all the information you would like, click Next.


Now in the Selected Fields box, it will show how your report will be organized (most likely by name) Click Next, and Next again. This will bring you to the Quick Report: Format Options Page. The default is webpage. You could also choose csv file if you prefer.


11.  For a quick check, you could click FINISH, and then view your report.


12. If you would like to save this report in Aspen, click NEXT again until you get to the Quick Report: Save Options page.


13. Name your Report. Click FINISH.

Thursday, October 13, 2016

Aspen: Assigment Extra Credit

Do you have assignments in which you want to give Extra Credit to students?

In Aspen, you can easily give your students Extra Credit on assignments.  This option is available when creating your assignment in the gradebook (see yellow box on image right).
There are two Extra Credit choices listed under Options on the right hand side of the Assignment page.  
Extra Credit Checkbox
The first choice is Extra Credit and checking the box makes the entire assignment an extra credit assignment.  
Note: If you select this checkbox, do not enter a value in the Extra Credit points field. 
  • Select the Extra Credit - whole assignment checkbox to treat the entire assignment as extra credit; or
  
Extra Credit Points
The second choice is Extra Credit Points.  This is the number of extra credit points that a student can earn on an assignment.  
Note: If you enter a value in this field, do not select the Extra credit checkbox.
  • Enter a value in the Extra credit points field to allow students to earn extra points, in addition to their earned points, for this assignment.

Choosing Both Options
If you select both options, then the entire assignment is considered to be extra credit AND the student can extra credit points on top of the total points earned for the assignment.

Choosing both assignments will affect your total for the quarter, making it appear much higher than it should.