Tuesday, September 29, 2015

Creating a Desktop Shortcut for your School Gmail

A few teachers and staff members have asked me if there is an easy way to create a desktop shortcut to allow them to easily access their school gmail account.  

The answer is yes, there is.  The video below will show you how you can create a shortcut in less than a minute.


Wednesday, September 23, 2015

Tech Help Desk Request Descriptions

When writing a Tech Help Desk Request (SchoolDude), please try to be as descriptive as possible.  This helps the computer technicians to quickly diagnose the problem.  

To further explain, the computer technicians do not receive a copy of your completed SchoolDude form.  Instead, they receive a shortened version that includes your room number, description, and request type. 

An example of what the computer technician receives is below.


The description states, "Printer says it is out of paper but there is paper", is not descriptive enough.  It is unclear what kind of printer is not working.  

A better description would include the model number of the printer and the tag number of the printer.  

For example,
The HP LaserJet CP1215 in the mods M A-4  is giving me the error that it is out of paper, but there is paper in it.  See teacher Jane Doe.  

How to find information for your description.

Model Number 
The model number is found on the device.  For example, HP printers usually have the model number on the front of the device.

Your laptop model number is located near the keyboard.


Tag Number
The Tag Number is a code that indicates the school, room number, grade or department of your computer or printer.  It is a printed label found above the keyboard on your laptop or on the front of the printer.


Thursday, September 17, 2015

How to Reserve a School Laptop Cart or Computer Lab

A few teachers have asked me how they can book a computer lab in my school, so I thought I would repost the instructions for booking the lab - or laptop cart - at your school.  Booking a lab/cart is done through your Google Calendar.

The first step is to read the blog entry, how to add a Resource Calendar to Google Calendar.  This step is done one time.  It adds the district's resource list calendar to your calendar display.

In the second step below, you will learn to book the time and resource on your calendar.  When you book the time, the resource (or lab/cart) calendar will also get updated so that no one else can book it at the same time.

Book your time with the lab/cart
Booking a school resource is done by creating an event on your calendar and then adding the resource to your event.  Follow the steps below or watch this video.

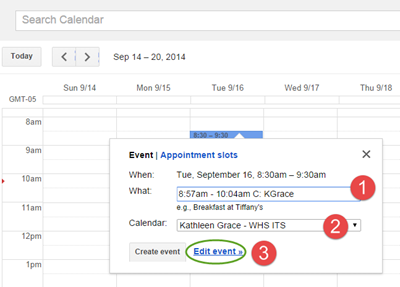
  1. Create the event on your calendar.
    For example, a HS teacher may want to book the Integration Lab during C: Block on Tuesday.
    1. By adding the time at the beginning of your description, you can schedule the resource for the exact time that you will need the resource.
    2. Add the event to YOUR calendar.  Google Calendar will automatically also enter it to the resources calendar for you.
    3. Click on the Edit Event link to go to the next step.
       
  2. Add the Resource
    1. Notice the event name in the description box.  It does not include the time that you previously entered.
    2. The time appears in the To and From boxes (see 2 on image right).
    3. On the right side of the event details page, you will see 
      Add: Guests ! Rooms, etcClick on Rooms, etc. 
    4. Select the resource that you want to use.
      The teacher in our example would s
      elect WHS-A103-Lab 
    5. Click Save.
    6. Please note: If an existing resource is not listed then it has already been booked by another teacher.
Once you have completed these steps, you should see the event on your calendar.  
The event will automatically be generated in the Google Calendar for the Resource.  
Finally, anyone else who tries to book the resource during the same time period will not see the resource under the Rooms, etc. list.


Wednesday, September 9, 2015

GradeQuick: Adding Photos to Seating Charts

As we start the school year, many high school teachers have asked me how to add photos to their GradeQuick class seating charts.  This is a great way to quickly learn names and also a great idea when you have a substitute for your class.

To create a Seating Chart with photos, 

  1. go to your gradebook for the class and select the Seating Chart icon (see right).
     
  2. In the Arrange Seats pop-up, select the arrangement that you would like to use.  Then click OK.
     
  3. After selecting the seat arrangement, select Options -> Seat Labels.
  4. On the Seat Label pop-up, select Full Name, Pictures, Scaled and then click OK.
If photos are not available for a student, you will receive a File Not Found message.  Click OK for any and each of these messages.

Students who do not have a photo in our school database will appear as only their name.  

Please note: freshmen photos will not appear until a couple of weeks after school photos have been taken.

Tuesday, September 1, 2015

Is your classroom technology working?


Welcome back to the 2015-2016 school year!  During your classroom setup, please take some time to check to make sure that your classroom technology is working correctly.

If your classroom technology is not working.
please remember that the fastest way to get it fixed is by putting in
a Help Desk Request.  


This time of year is extremely busy for the IT staff. The tech department has been busy configuring and setting up new technology throughout the district as well as getting many Help Desk Requests.  Please be a little patient, and also take some time to thank them for the great job that they do!